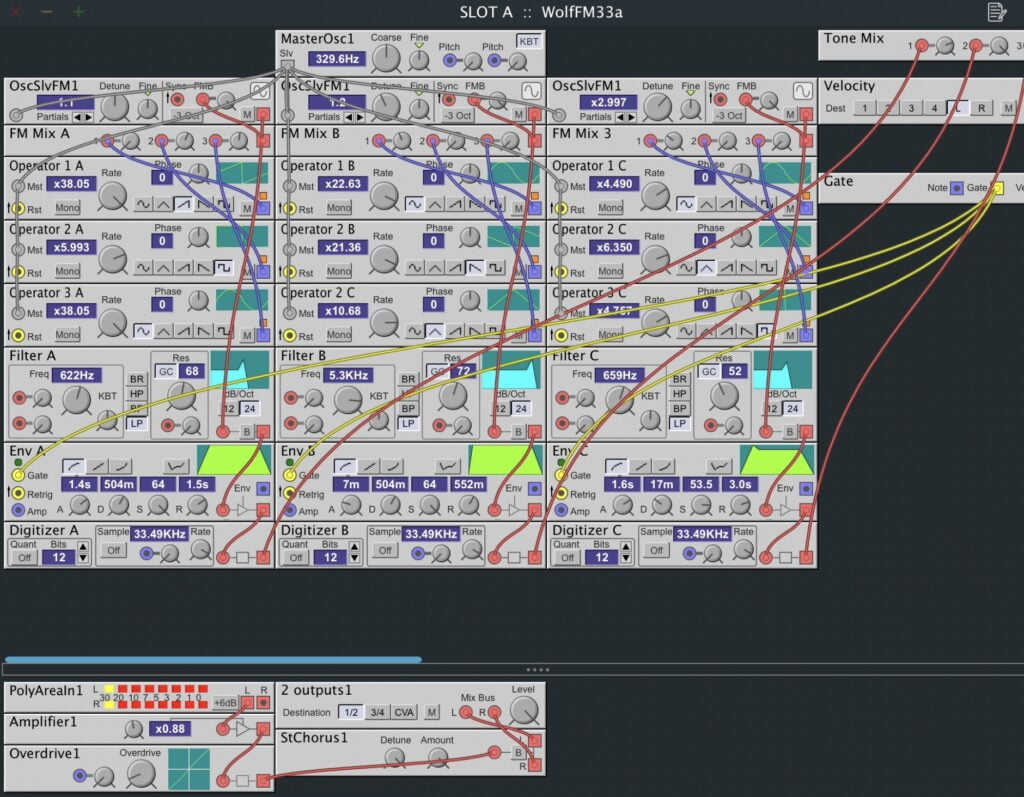
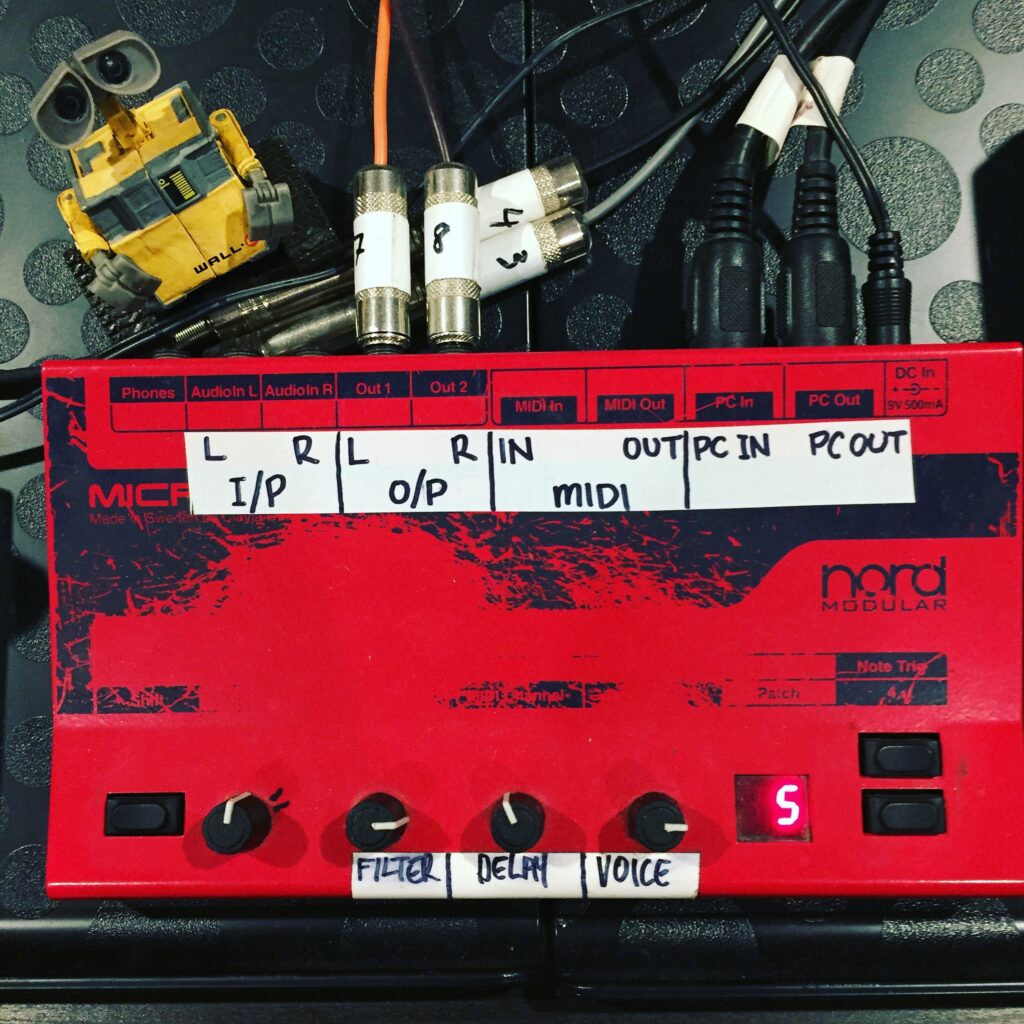
A selection of sounds from the first synthesizer I ever owned, my beloved Nord Micro Modular.
Produced in 1999, and featuring a software editor that was ahead of its time, it may have been small, but it still packs a punch! This is a selection of sampled sounds ported for use as Ableton Instrument Racks, that includes a bunch of interesting effect options.
The frequency ranges listed, highlight common areas for correcting or enhancing vocals with EQ. If you’re new to EQ, please see the main EQ guide sections.
100-250Hz – Boosting gives the vocal a more “in your face” type of sound
250-800Hz – Muddiness
400-800Hz – Boxiness
500-1kHz – Nasal
3kHz – Critical, boost for vox clarity
1-6kHz – Presence
6-8kHz – Clarity BUT Sibilants
8-12kHz – Brightness and Air
What is Equalisation (EQ)
Equalisation is a process commonly used to adjust the frequency balance of an audio signal. A basic form of EQ are the bass and treble controls of a hi-fi system. Equalisers adjust the volume (amplitude) of a particular set of frequencies effectively making them frequency specific volume controls. In the studio we generally use a complex set of EQ controls giving the engineer ways of targeting very specific frequencies. EQ can be thought of as a corrective or creative process.
Reasons to EQ
There are varied reasons for requiring the application of EQ.
Instrument blending. In the mix it is common practise to use EQ to reduce frequencies that clash or to make room for certain instruments (i.e. increasing separation between instruments – Kick drum and Bass Synth).
Cutting out unwanted sound, mouth clicks and pops, background noise and hiss.
Make up for deficiencies in a signal caused by poor instrument choices or poor microphone technique.
To emphasize the good parts of a signal.
To create a special effect.
Adjusting the character of a sound (tonal balance)
Matching a sound to a previous mix or overdub.
When to EQ
EQ’ing a signal can be done at any stage of the recording or mixing process.
Initial Recording.
Song writing
Overdubbing (adding to the original recording).
Mixing
Mastering.
There are no rules as to when the best time to EQ a signal is.
Waiting until the mixdown stage will give you more of an idea as to the general content of the sounds you will have to combine together. However, EQ’ing during recording means that you can EQ a second time during mixdown and hopefully improve it further.
It is important to remember that EQ’ing straight to Disk or tape during recording can’t be undone.
85-90dBSPL is a good level to listen to signals when applying EQ. Too low a volume level may give you a false impression and start to sound worse when played back at higher volumes.
Within a room, the size, shape, speakers used and materials in the room will all affect the amount and type of EQ’ing applied.
How to find Problem Frequencies
To find an EQ point with a sweep equaliser, apply maximum boost and sweep the frequency range until the desired or undesired frequency becomes obvious. If boost is employed in all, or nearly all, bands, the effect is the same as raising the fader.
EQ Types
Shelving EQ
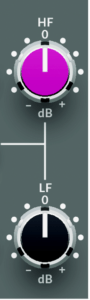
The most common form of shelving EQ is the simple bass and treble dial. On a mixing console, like the Solid State Logic SiX mixer on the left, these will typically be labelled as HF & LF.
On the SiX, the amount of cut/boost in dB & shelving points are not stated on the device.
Its Shelving points are as follows: • HF: 3.5 kHz. • Bass: 60 Hz.
These are adjustable with + 15 to -15 dB of gain
The low frequency shelving point of 60Hz means that all frequencies below 60Hz will be boosted or cut by the amount on the LF control. The high frequency shelving point of 3.5kHz means that all frequencies above 3.5kHz will be boosted or cut by the amount on the dial.
80Hz & 12kHz are common shelving points as are 100Hz and 10kHz.
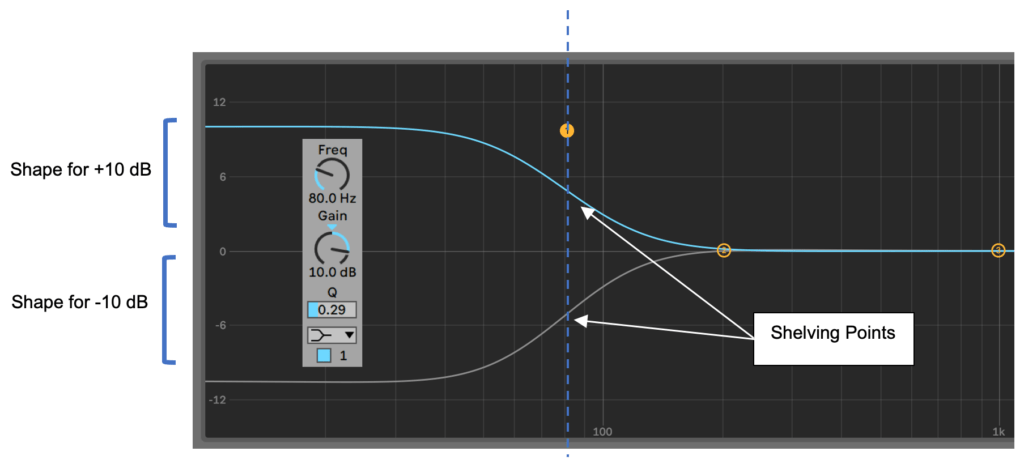
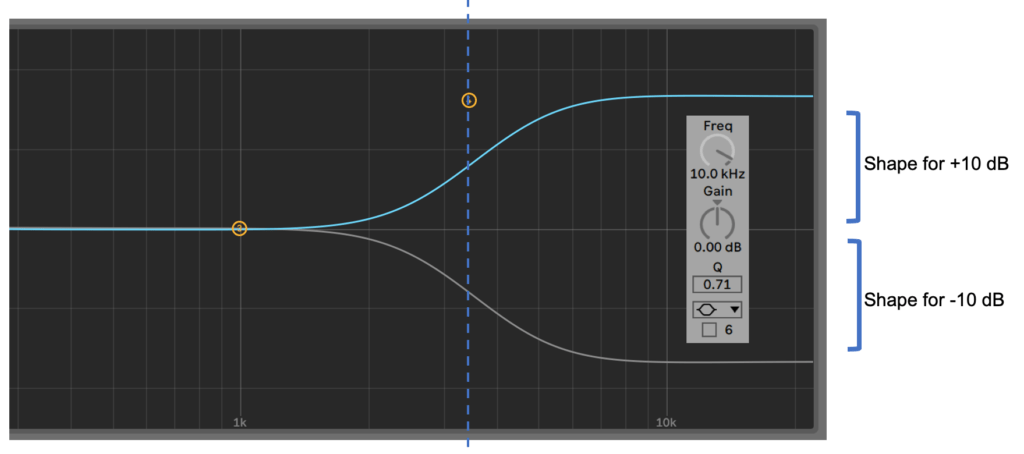
The following example shows a graphic representation of the shelving point for the low frequency dial at 80Hz with 10dB of gain.
The dashed line indicates the shelving point at 80Hz. Note that some of the frequencies above (to the right of the dashed line) are also affected. It is also worth noting that some frequencies just below the 80Hz shelving point have not reached a uniform boost or cut. It is important to keep this effect in mind when using any type of EQ as you may be inadvertently changing frequencies that you do not wish to change.
Below is the hi shelf equivalent with the shelving point set to 10kHz for adjustment of high frequencies.
Note that this type of shelving EQ, as found on the SiX, has a fixed shelving point. This means you will not be able to adjust where the shelving points are set. You only have control over how much cut or boost you apply.
Parametric Shelving EQ.
A parametric shelving EQ gives you much more control. It gives you control over the shelving point and the steepness of the EQ curve, typically labelled Q.
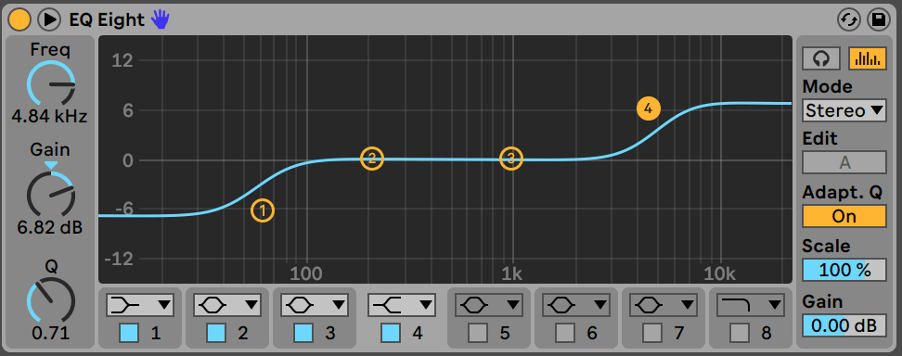
In the Ableton EQ8 example below, the Low Shelf is cutting and High Shelf boosting. In this example, we are able to adjust the shelving point. This means we can control at what point in the frequency range we are applying cut or boost.
The Q control gives us the ability to adjust the steepness of the EQ’s curve.
Ableton EQ8
Parametric EQ
A parametric EQ allows you to vary the gain amount, the centre frequency and the bandwidth of the frequencies that are being cut or boost. Unlike a shelving EQ, parametric deals with centre frequencies with the EQ curve resembling more of a bell shape than a shelf.
There are 3 dials per band on a parametric EQ
Gain – Measured in decibels (dB)
Centre frequency – Measured in Hertz (Hz)
Q (Bandwidth). The bandwidth is generally referred to as the Q value or is sometimes measured in octaves.
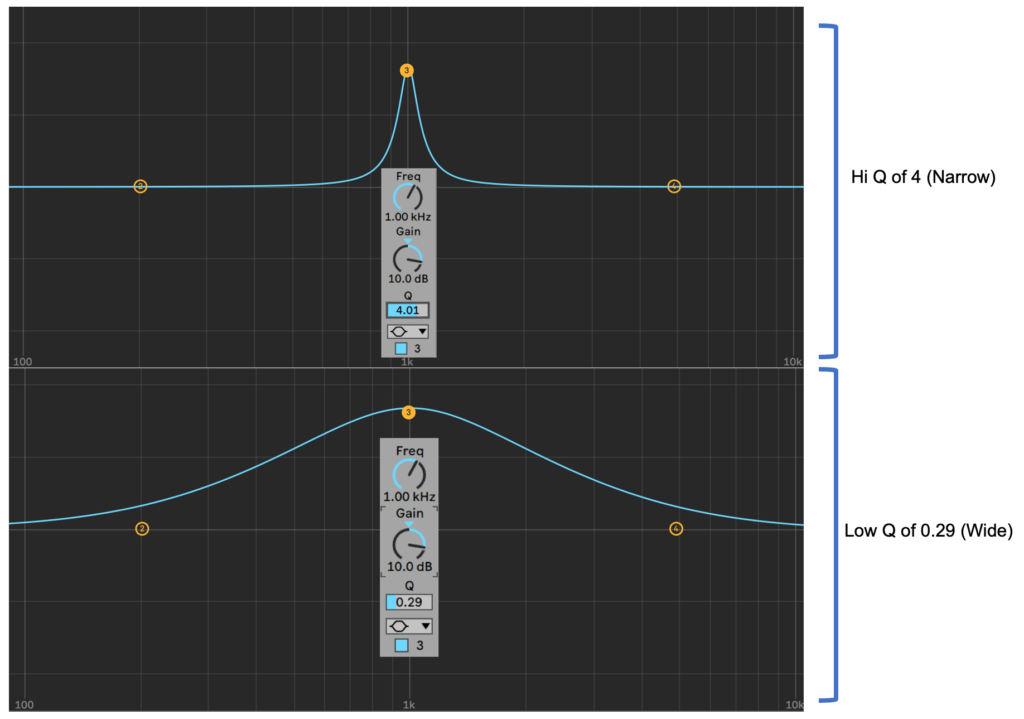
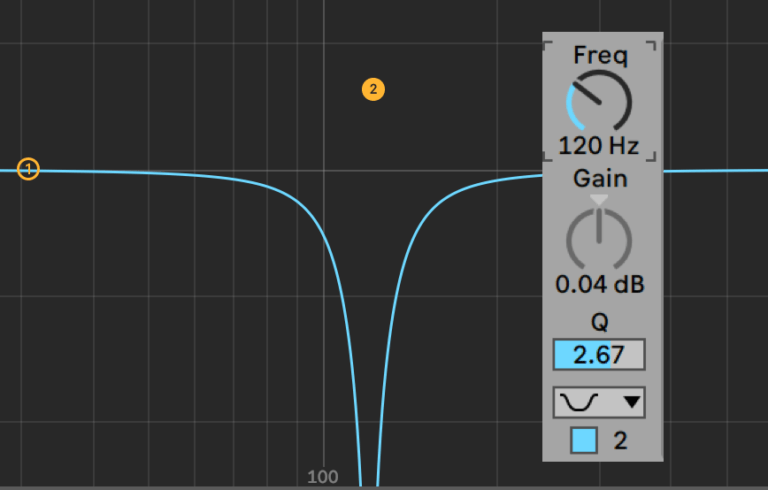
Q refers to the width at the peak of the signal/frequencies being cut/boost. The Q value of a parametric EQ can be adjusted to be wide or narrow (notch).
The Q value of a bandwidth dial is generally represented from numbers 1-10 with 1= wide and 10 = narrow.
In the Example below we have 2 EQ’s both applying 10dB of gain at 1kHz. Only the Q values are different. The Hi Q value is showing a narrow bandwidth with the Low Q showing a wide bandwidth. This can vary the EQ’s tone dramatically
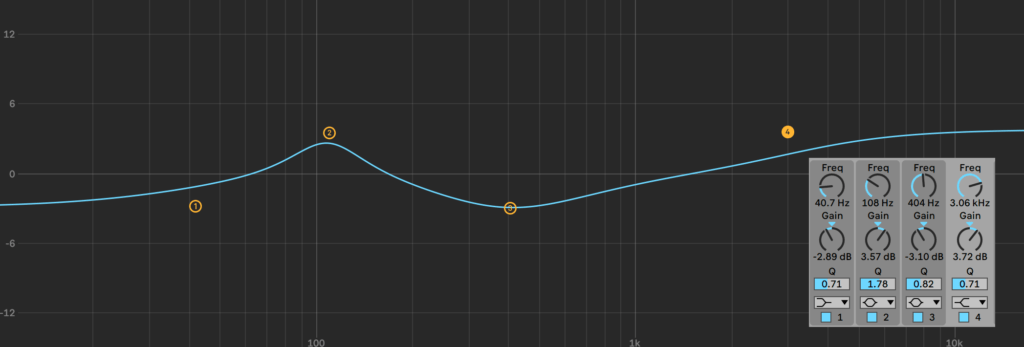
In the below example we are using 2 bands of shelving and 2 band of parametric EQ within the one EQ8 effect in Ableton.
Band 1 – Low Shelf, a mild 2.89dB cut @ 40Hz to remove some unwanted sub bass
Band 2 – Parametric, 3.57dB boost @ 108Hz to give the sound a little bit more power.
Band 3 – Parametric, 3.1dB cut @ 400Hz to remove some un-wanted “boxiness”
Band 4 – Hi Shelf, 3.72dB boost @ 3.72kHz to add some air and sparkle to the mix.
Notch Filter
A similar principle, the notch filter is a high-Q, band cut filter with higher amounts of attenuation. It is used for slicing or removing a band of problem frequencies.
High & Low Pass Filters
These filters offer some differences to the other filter types already mentioned. They can be used in many situations including use on mixing consoles for the purpose of filtering out unwanted bass rumble frequencies or synthesizers where they are used to shape the final tone.
High Pass Filter – A filter that allows high frequencies to pass while attenuating (turning down) those below a specific frequency known as the cut off frequency. Just to confuse matters, some EQ’s like the Fabfilter Pro-Q refer to these as Low Cut Filters
Low Pass Filter – A filter that allows low frequencies to pass while attenuating those above a specific cut off frequency. (High Cut)
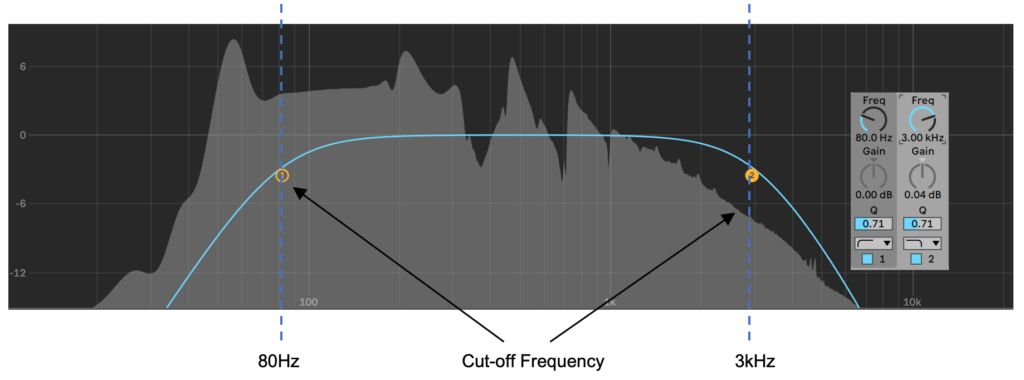
All high and low pass filters will have a cut off frequency. This is the point at which the filter starts attenuating the signal
In the example above, we have a high pass filter set to 80Hz, everything below the cut-off is being filtered out (attenuated) progressively more as the frequency decreases. At the other end of the frequency spectrum we have a High Pass Filer set to 3kHz, everything above the cut-off is being filtered out.
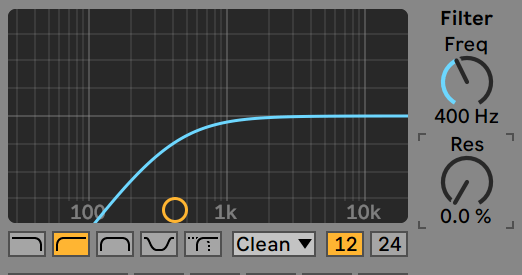
The examples below show Ableton Lives Auto Filter plug-in.
This is a HPF set to 400Hz. This means that all frequencies above 400Hz are being allowed to pass through and be heard where all frequencies below 400Hz are being progressively filtered out.
Some high and low pass filters will have a variable cut off frequency, whilst others have a fixed cut off frequency (it is either turned on or off).
The next important feature of many High Pass & Low Pass filters is the steepness of the filter curve, often measured in dB per octave.
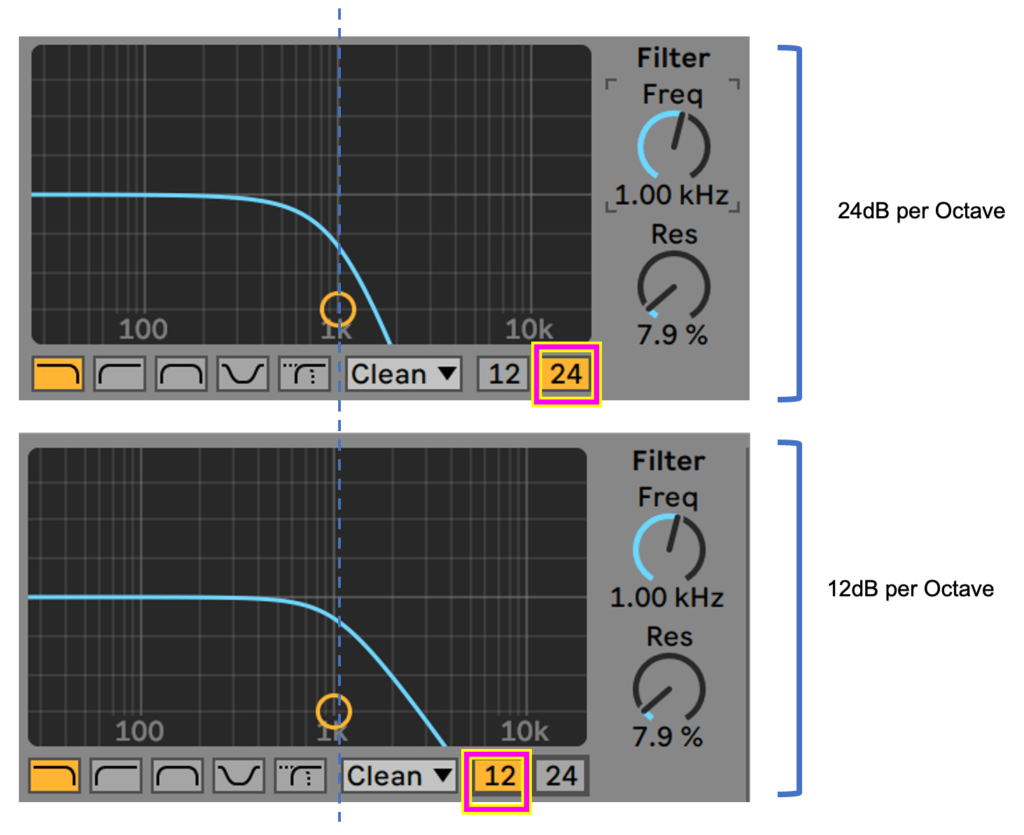
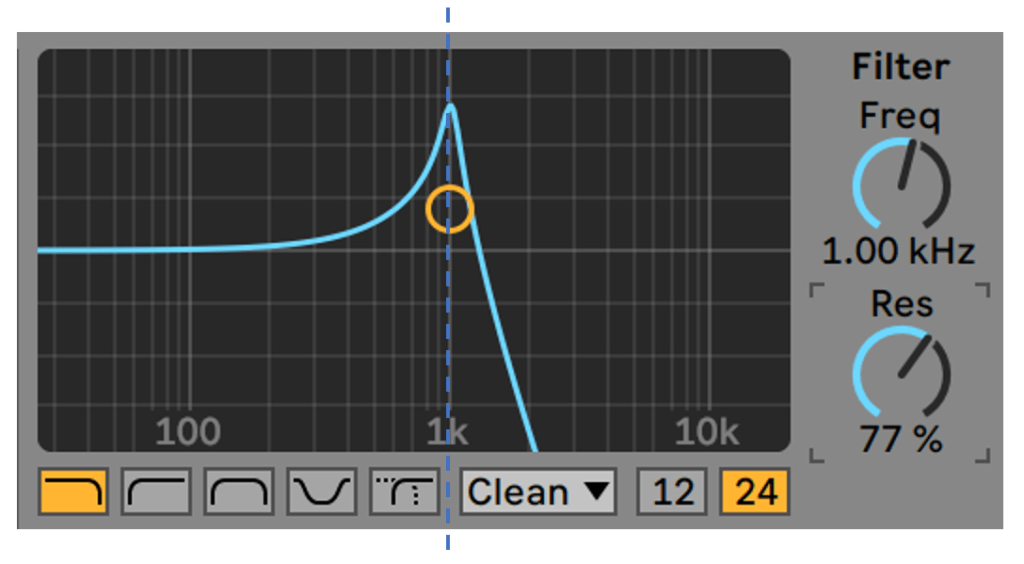
In the following example we have 2 low pass filters setup with their frequency cut-off control set to 1kHz. The top example shows the use of a 24dB per octave filter (steeper) with the bottom showing a 12dB per octave filter.
Notice how the filter curve after the frequency cut-off (indicated by the blue dotted line) is steeper and achieves full filtration earlier than the 2nd example. This means the top 24dB per octave example will filter out more frequencies than the 2nd example. Ultimately the 2 curves will sound different and which one you choose is completely dependent on the sound you are trying to achieve.
The steepness or dB per Octave value will vary between filters and are usually one of the following types.
-6dB per octave = 1st Order (1 Pole)
-12dB per octave = 2nd Order (2 Pole)
-18dB per octave = 3rd Order (3 Pole)
-24dB per octave = 4th Order (4 Pole)
Some Hi and Low Pass Filters will also have a resonance control. This control allows you to apply a boost in level at the cut off frequency. This can change the character of the filter quite dramatically.
Ableton Auto-Filter
Resonance is a common effect found in filter sections of Synthesizers and Samplers. High amounts of resonance whilst sweeping the frequency can give interesting results and is an effect often heard in modern forms of electronic music.
High Pass Filters are not only useful in synthesizer and music production scenarios. Most mixing consoles will have a high pass option which can be switched on to remove unwanted bass frequencies.
Example – if a mic has a range of 20Hz- 20kHz and the persons speaking voice is picking up frequencies between 80Hz – 12kHz, any low frequency noise below 80Hz will still be picked up. It would be best to cut these frequencies out as they may cause low level “rumble”.
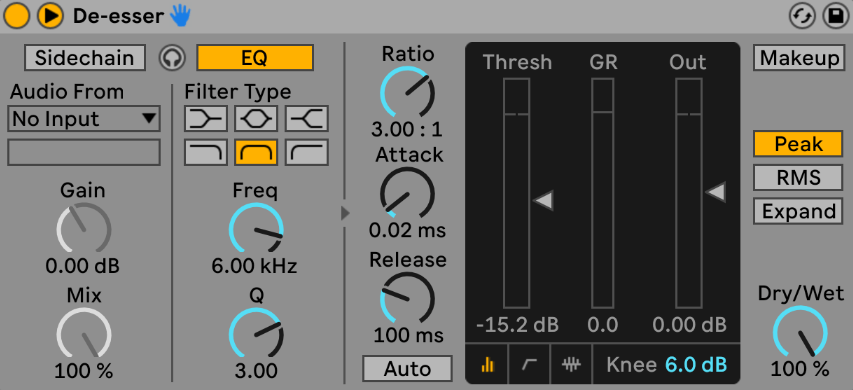
Although Ableton Live doesn’t have a dedicated De-Esser plug-in, it has a serviceable De-Esser preset that uses Lives Compressor. Simply go to the list of presets for Compressor and load the Ableton Deesser Preset onto a track.
In this preset the sidechain EQ is activated. Enabling this section causes the compressor to be triggered by a specific band of vocal frequencies, instead of a complete signal. I personally prefer the EQ filter type to be changed band pass as seen in the screen shot above. You can then use the Freq dial to zero in on the sibilant frequencies. The Sidechain Listen (headphones button) between the external and EQ sections allows you to listen to the sibilant frequencies to make this adjustment easier.
It is then simply a case of adjusting your Threshold until the required amount of De-Essing is reached.
Ableton Deesser Preset
Deesser
The human voice exhibits prominence to different degrees in the high mid region (4-10KHz). This is referred to as sibilants. This over-emphasis can cause audible distortion in some devices, even though it may not appear that prominent.
Sibilance – def. – A sound with an exaggerated “s” and “shh” caused by a rise in the frequency response around 4-7kHz. Most noticeable on vocals and cymbals.
A de-esser is a device based on a compressor, but it is frequency dependent.
Using De-essing Effectively
To use de-essing most effectively, insert the De- Esser after compressor or limiter plug-ins. The Frequency control should be set to remove sibilants (typically the 4–10 kHz range) and not other parts of the signal. This helps prevent de-essing from changing the original character of the audio material in an undesired manner.
Similarly, the Range control should be set to a dB level low enough so that de-essing is triggered only by sibilants. If the Range is set too high, a loud, non-sibilant section of audio material could cause unwanted gain reduction or cause sibilants to be over-attenuated. To improve de-essing of material that has both very loud and very soft passages, automate the Range control so that it is lower on soft sections.
Reverb is such an important effect, it brings a sense of space and helps to get the most out of your mixes. At STAK we have a few favorite reverb effects that make it into most of the music and vocals we create. We thought it was about time we took you through our Top-3 Reverb Effects. Whatever reverb you choose, take the time to learn its intricacies, your mixes will thank you for it!
Producer Tip: when using reverb, it’s better to err on the side of caution. Too little is nearly always better than too much. This way, the reverb will support, rather than overwhelm, the dry tracks.
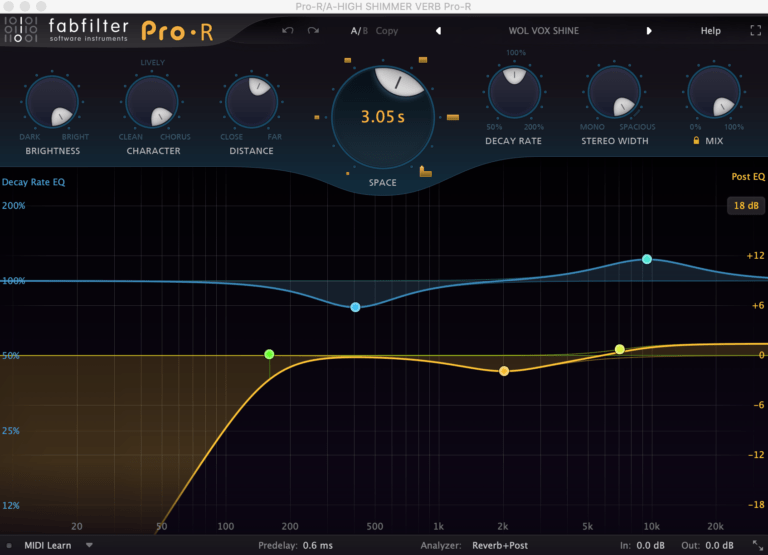
Fabfilter Pro-R
Fabfilter Pro-R
Fabfilter Pro-R: A lovely sounding reverb with a pristine, rich & smooth sound. It has a lot of flexibility without being too difficult to use. It has a Decay EQ and Post EQ section that allows the reverb to be easily sculpted. This is our go to reverb for longer (3-second and above), brighter, shimmering reverbs.
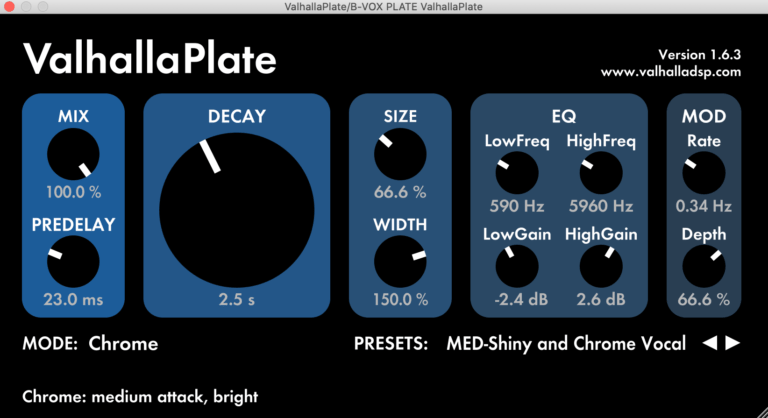
Valhalla Plate
Valhalla Plate
Valhalla Plate: Perfect in many situations, plate reverbs give a bright and smooth reverb. We often use Plates on Vocals and Snare drums. See the section on Hardware Plate Reverb below
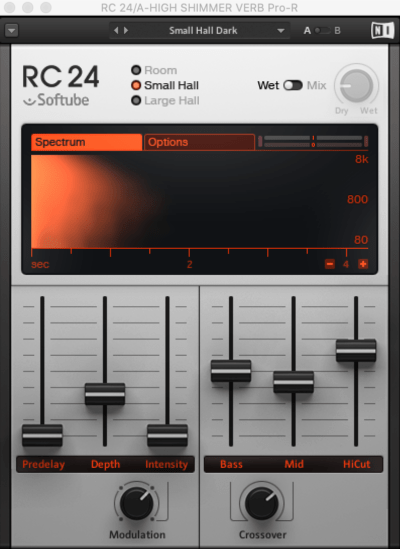
Native Instruments RC24
Native Instruments RC24 by Softube
Native Instruments RC24: A re-creation of one of the most famous digital reverbs, the Lexicon 224. It was released in 1978 and was used on a large number of influential albums and singles through the 80’s & 90’s. We love it on synthesizers and anywhere that’s in need of a bit of 80’s digital vibe.
Reverberation – Introduction
In order to create a sense of space in audio recordings, reverb is often added to signals such as voice and instruments. Often, sounds are recorded with close microphone techniques, resulting in a lack of natural reverb.
To compensate, an approximation of reverb can be added to the mix through an effects unit. However, excessive use of reverb can cause sounds or entire mixes to become unclear and muddy.
Reverb is characterized as repeating sound waves that become increasingly denser (closer), and weaker over time in an enclosed space. This results in a density of echoes that cannot be distinguished from one another.
Sends & Returns
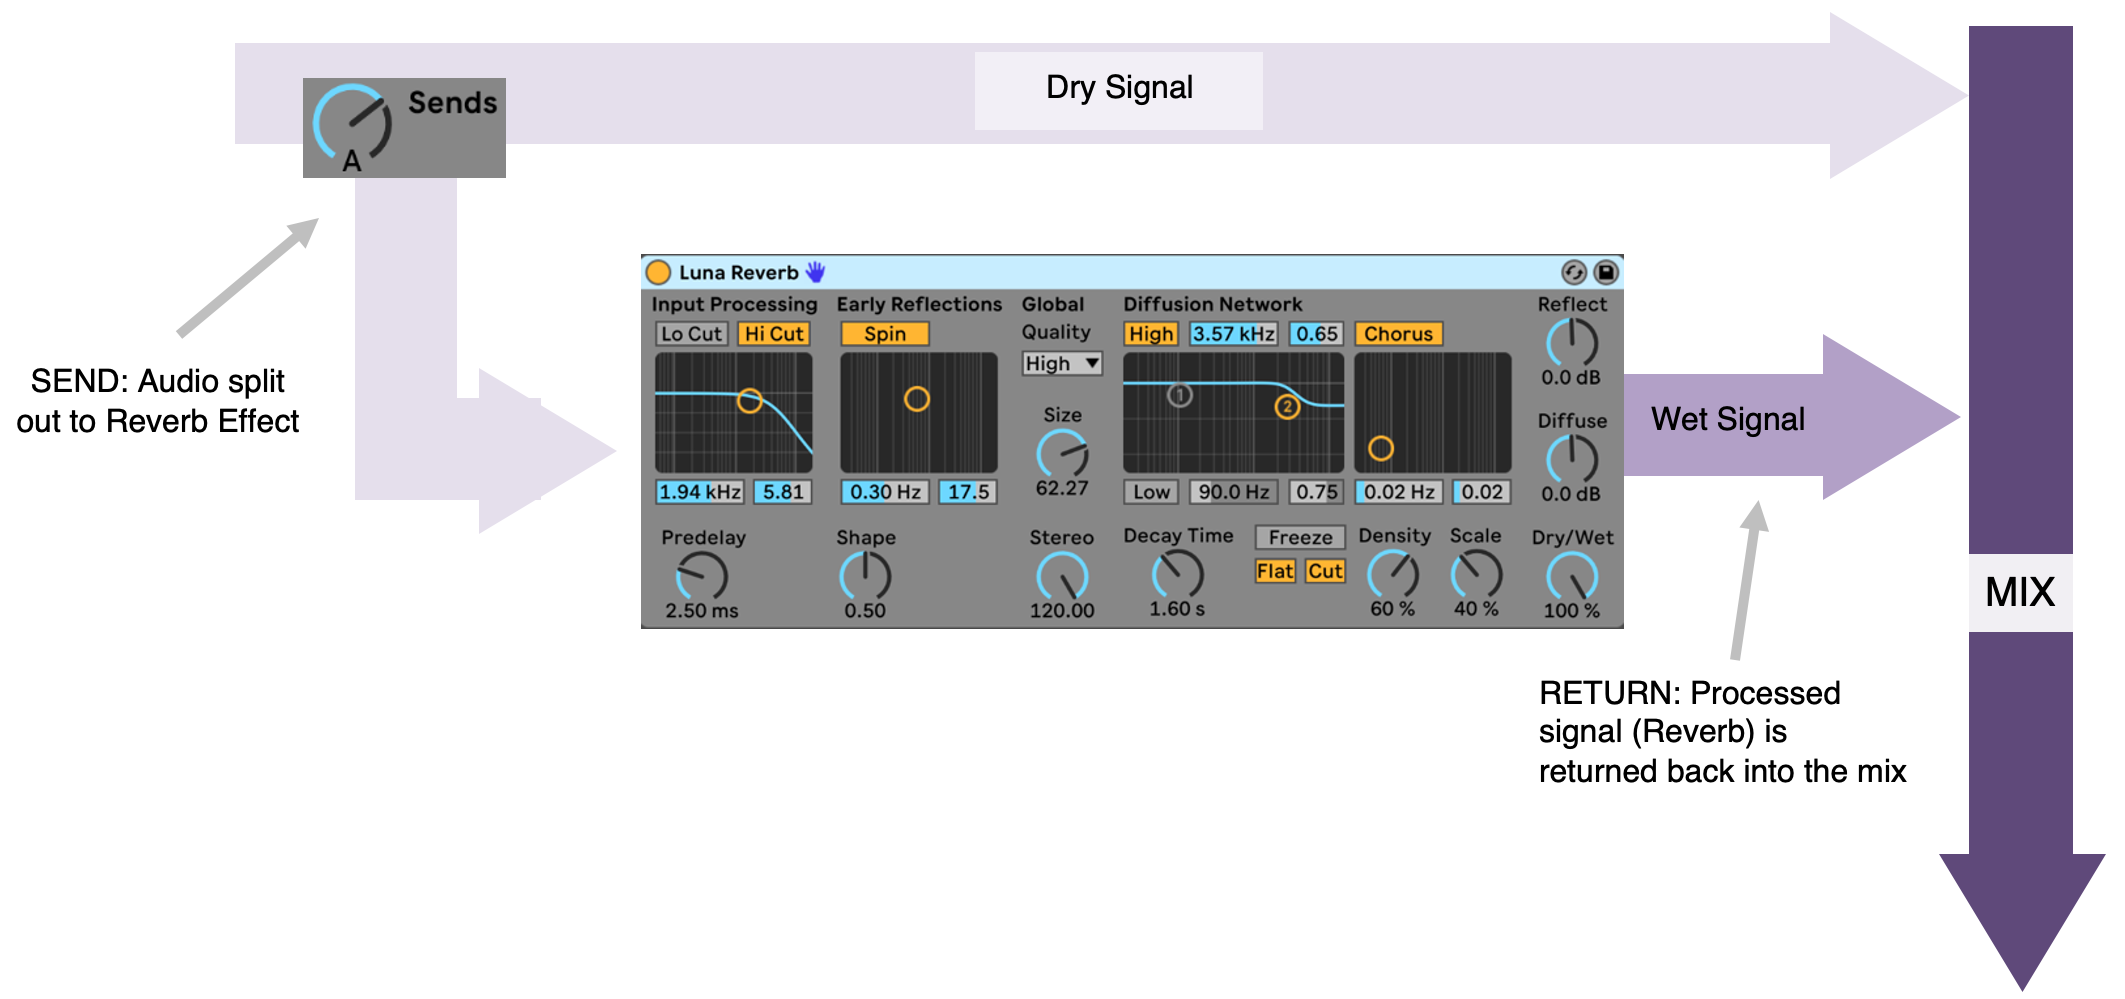
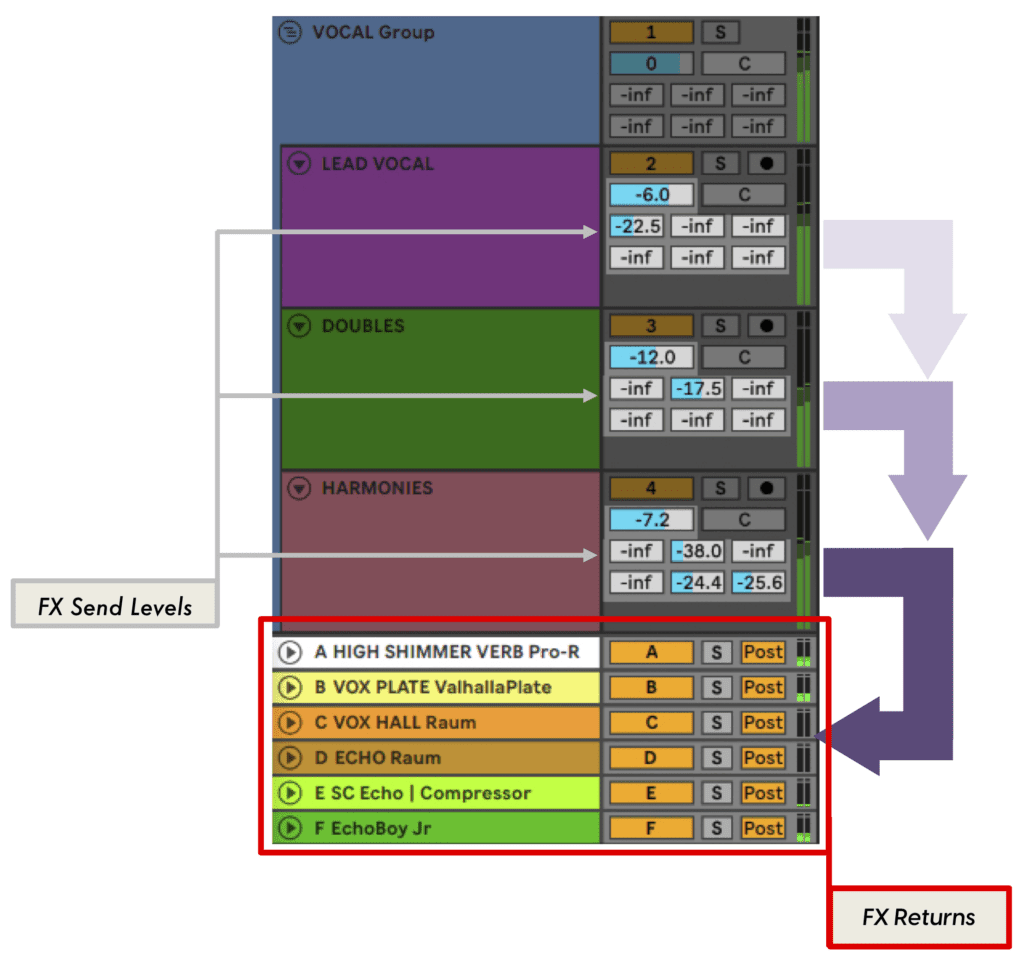
Effects (FX) such as Reverb & Delay are typically added to a split or copy of the signal. The FX is applied to this split/copy and then mixed back in with the original signal. This is commonly referred to as the Send and Return technique. The split or copy is “Sent” to the FX unit, the FX is added to the signal and then the FX signal is “Returned” to the mix.
Making a split or copy of a signal usually involves the use of a mixing console (virtual or physical) with the FX applied to a signal via a software plug-in or hardware fx unit.
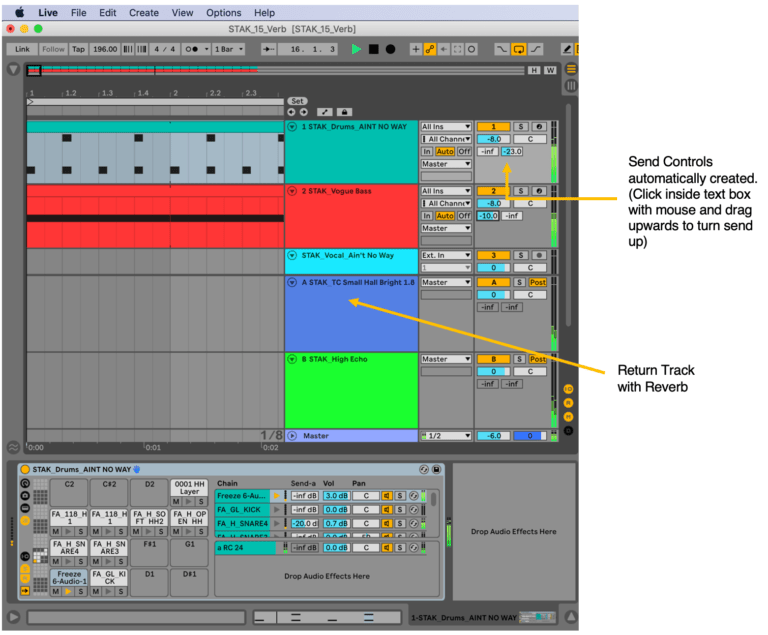
Ableton Live Mixer – Send and Return Set-up
Setting up Send and return FX in Live is also relatively easy and parts of the process are automated for you:
In live, simply go to the Create menu and choose “Insert Return Track.
The Send knobs for that Return track will be automatically created on all other tracks.
Drag the effect you require onto the Return Track.
Ensure the effect is set to 100% Wet.
Turn the Send Knob up on the track/s requiring the effect.
Send & Return in Session ViewSend & Return in Arrangement View
A software plug-in, will contain many factory presets. These are effects that have been pre written by the manufacturer and can be used straight away. In most cases the presets themselves will have a number and title that best describes what sort of effect it is.
All of these presets will have editable parameters. A parameter is an aspect or part of an effect that can be altered by the user. The parameter for a program will change depending on the type of effect.
Digital Reverberator Parameters
Type – plate, hall, room, spring, gated, non-linear.
Decay – the time taken for the reverberant field to fade out.
Pre-delay – the time difference between the direct sound and the first arriving reflection.
Early Reflections – the first and strongest reflections, usually not perceptible as individual reflections.
Density – the number of reflections over a given time period. Density increases with time. High density produces a thicker sounding reverb.
Diffusion – the smearing of transients caused by multi-directional reflections. High diffusion produces a smoother sounding reverb.
HF/LF Decay Ratio – the relative decay rates of HF and LF. Natural acoustic environments tend to absorb HF more readily than LF.
Bandwidth – the frequency range of the reverb.
.
Tips for Using Reverb
Reverb and delay are standard effects used in mixdowns, but they can seem overwhelming to musicians who are still learning the basics of studio production.
The variety of devices available and their different editing parameters are two main aspects contributing to this confusion.
Starting with a Preset. If you don’t know where to start, use a preset. There’s often a preset that comes close to the sound you want.
If you’re not sure what sound you’re aiming for, imagine what kind of space you’d like your mix to inhabit: big, small, or a specific type of environment.
You may have to go through several presets before finding the right fit for your mix. Be careful with presets that produce a metallic sound, especially in response to noisy tracks like drums. Metallic resonance can make the effect sound too obvious and unpleasantly color the mix as a whole.
Be cautious with reverbs that have prominent frequency extremes when looking for something that will gel and bring your mix together. Very high frequencies make the reverb too audible, and very low frequencies reduce punch at the low end of the mix where definition is crucial.
Adjusting the Reverb. Assuming you now have a useable preset, you may now wish to tweak it to make it exactly right for your track. Some reverb parameters end up being much more useful than others, so here are a few pointers for getting the quickest results.
Once you have a suitable preset, you can tweak it to fit your track precisely. Some of the controls that will help you get the quickest results are:
Length: Adjusting the length of the reverb is crucial for achieving the perfect balance across all tracks. Too long and the reverb will wash away definition and clarity within your mix. Too short and it may feel unnatural. Experiment with different settings to find the best balance.
Tone: A separate equalizer following the reverb in the return channel usually provides greater flexibility than the built-in equalization controls of the reverb processor. That way, you can cut high or low frequencies further, sculpting return channel tonality to make it blend seamlessly into the mix.
Pay close attention to the amount of lower frequencies below 300hz and above 10kHz
Pre Delay: Another reverb parameter that you can adjust is the pre-delay setting, which delays the onset of the reverb reflections by a specific amount. Pre Delay can be helpful to separate the dry sound from the reverb, and gaining definition.
More Than One: Using more than one reverb in the mix is an effective tool to achieve the desired soundscape. The shorter reverb blends tracks together more convincingly, while the longer reverb gives a sense of acoustic space. You can use the mix of both reverbs to deal with various situations.
Tips: Typically, I’ll have short, medium and long reverbs within a mix.
Personally, I rarely apply reverbs to low frequencies.
Lastly, when using reverb, it’s better to err on the side of caution. Too little is nearly always better than too much. This way, the reverb will support, rather than overwhelm the dry tracks.
Hardware Reverb Types
Acoustic echo chamber. The following video from Waves summarises the Studio-2 chamber at Abbey Road Studios and their re-creation of it: https://www.youtube.com/watch?v=kWSxWztDxf4
Plate reverb unit. The device’s foundation is a steel plate measuring around 2 meters in length, 1 meter in height, and 0.4mm in thickness. The plate is positioned upright within a framework and is tensioned with precision. A driver, resembling a loudspeaker, is centrally mounted to induce vibrations on the plate’s surface. These vibrations propagate throughout the plate and are reflected back from its edges. The mechanical movement is then converted into an audio voltage by a vibration pick-up at either end of the plate. The length of time the vibrations persist can be regulated by adjusting the position of felt dampers located on the plate’s surface.
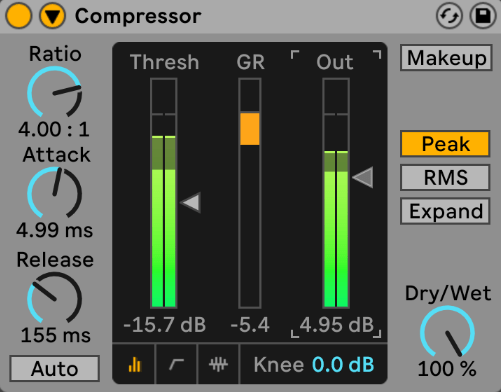
Alternatively set to AUTO which will set attack and release automatically.
Loop a quiet part or phrase within the vocal.
Gradually lower the threshold dial until the unit is just starting to compress the signal by 1-3dB
You can monitor this on the gain reduction meter.
Play through the vocal performance and go for around 6-10dB of gain reduction during the loudest passages.
Turn up the Output / Gain to +7 or +8dB to add back the level compression took out.
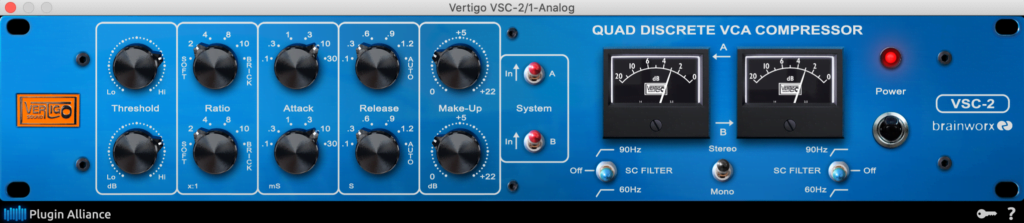
Ableton Compressor Vertigo Sound VSC-2 Compressor
The following is a series of steps to make general compressor settings that will work on many different sound sources, or at least be a good starting point.
Set Threshold to maximum (all the way up)
Set Ratio dial to 2:1 (an average ratio – for every 2dB above,1dB attenuated)
Set Attack to 20ms (average)
Set Release time to 200ms (average)
Alternatively set to AUTO which will set attack and release automatically
Gradually lower the threshold dial until the unit is compressing the signal by 6-8dB
You can monitor this on the gain reduction meter
Turn up the Output / Gain to +7 or +8dB to add back the level compression took out.
Exactly what threshold, attack, ratio, release and output settings you use on a compressor will vary depending on what type of signal you are processing.
Common Compressor Settings
The table below lists some common compressor settings that suit various purposes.
Try spending some time playing with the suggested settings to produce the sound quality described in the Audio Source column. (Be realistic: don’t try to turn a terminally flabby kick drum into a tight, punchy one).
How to use the settings
Pick a sound source.
Insert a compressor and dial up your chosen settings.
Reference between the processed and unprocessed sounds. (Remember to set the output gain to compensate for the level drop caused by compression).
Does the compressed sound match the description? The settings are starting points and will most likely need to be adjusted to your source. It would be a worthwhile exercise to take a fairly neutral source and try each of the settings recommended to pull different sounds.
Audio Source
Attack ms
Release ms
Ratio
Knee
Gain Reduction
Vocal Control
Fast
200
4 : 1
Hard/Soft
5 – 10
Vocal Aggressive
Fast – 5ms
40 – 100
6-8 : 1
Hard
5 – 15
Bass Guitar Gentle
4
120
2.5 : 1
Soft
3 – 10
Bass Guitar – Enhance Note Attack
16
80
4 – 1
Hard
5 – 10
Kick Drum – Tight & Punchy
16 – 50
300
4-8 : 1
Hard
5 – 10
Kick Drum Gentle
16 – 50
300
2 : 1
Hard/Soft
6 – 6
Snare Thick
Fast
100
6 : 1
Hard
5 – 10
Snare Snap
20 – 40
100
4-8 : 1
Hard
5 – 10
Elec Guitar
15
60
8 : 1
Hard
5 – 10
Drum Group (Bus) Gentle Control
2
300
1.5-2.5 : 1
Soft
2 – 6
Drum Group (Bus) Squashed Vibe
2
100 – 200
10 : 1
Hard
5 – 15
Mix Bus – Gentle
50 – 150
300
1.5-2.5 : 1
Soft
2 – 6
Compressors & Limiters
A compressor works like an automatic volume controller.
A compressor affects the level (amplitude) of a signal, whereas an EQ will change the tone or frequency balance. A compressor is classed as a dynamic signal processor or Amplitude Domain processor.
A compressors main function is to reduce the dynamic range (DR) of a signal. The dynamic range of a signal is defined as the ratio of the loudest peak to the quietest, expressed in decibels (dB).
A compressor is used for a number of reasons:
The musicians performance may vary widely. Inconsistent drummers, bass players & vocalists often need help to get their signals/sounds to sit evenly in a mix.
For creative reasons. Compressors (limiters & expanders) can be used to radically change the dynamic envelope of a signal. This allows us to take a sound & completely warp it dynamically. Sounds can be made so completely different they are unrecognisable.
Compression may take 3 possible forms:
Using Compressors and Limiters – Both are devices which restrict dynamic range. A limiter is simply a more severe compressor.
Manual Gain (Fader) Riding – The engineer follows the dynamics of the piece of music as it is played, reducing the fader level when peaks occur and increasing the fader level in the quiet parts of the program. This method is commonly used but is not fool proof. It requires considerable practice & a good deal of intuition.
Restricting Dynamics in Performance – The musicians restrict their own dynamic range. The success of this depends on their skill. Also, tonal colouration will often be affected.
Compressor Definition: An amplifier whose gain decreases as it’s input level increases above the threshold.
Limiter Definition: is an amplifier (compressor) whose output level remains constant regardless of how high the input level exceeds the threshold by. Limiting is the most severe form of compression.
When an incoming signal goes above a certain signal level (the threshold), the compressor will turn the signal level down. It will reduce the level of signals above that threshold level.
When the signal going in drops in level (back below the threshold), the compressor will leave the signal alone – it may change the signals level according to the setting of the ‘Make-up gain’ (also called O/P level) but this will be by a fixed amount & most importantly, the DR won’t be modified below threshold.
When a signal is being compressed, its volume is being lowered but the average ‘Density’ of the mix is being increased – the softer & louder signals are being brought closer together – the dynamic difference between the 2 is reduced. The overall level can then be brought back up to the same peak level as before compression using the Make-up or Output Level control. This has the effect of raising a signals “Average Loudness”.
Compressor Controls
Most compressors will have 5 main controls
Threshold
Ratio
Output (make-up gain)
Attack
Release
Threshold
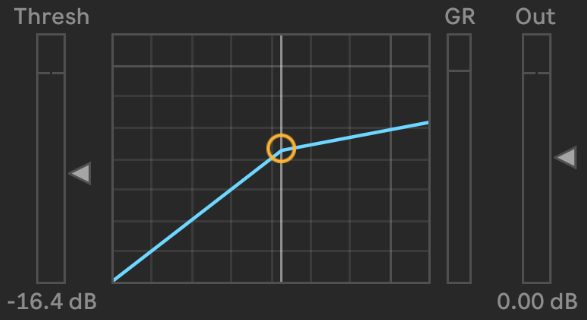
Sets the level above which the compressor starts to turn the signal down (i.e. compress it)
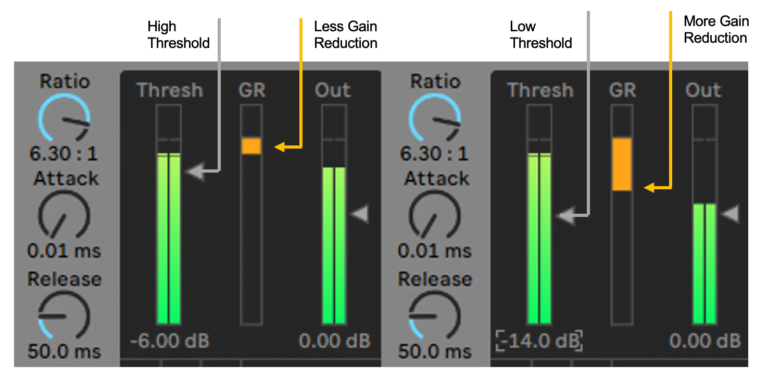
Set the threshold high – not much of the audio signal will be compressed.
Set the threshold low – most of the audio signal will be compressed.
Ratio
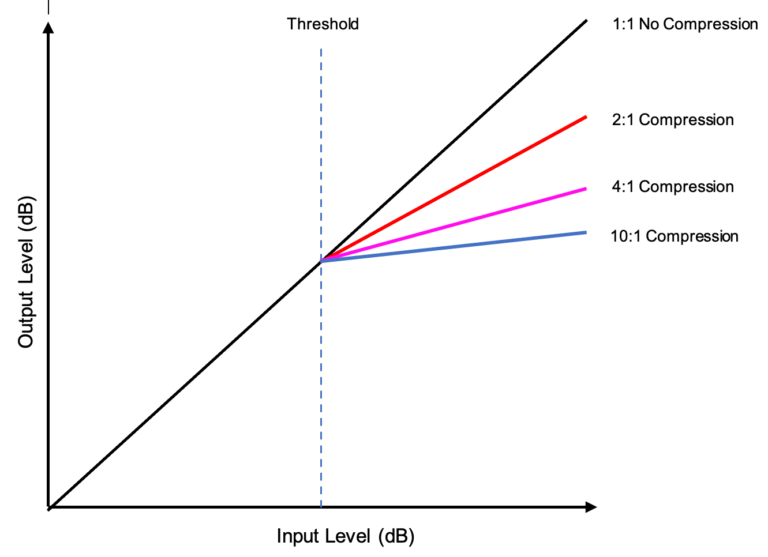
This dial will determine how much a signal above the threshold will be attenuated by.
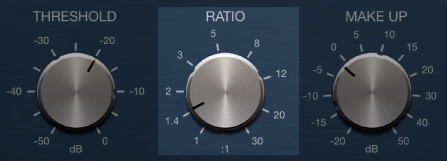
Logic Pro Compressor Ratio
The higher the ratio, the more a signal is compressed above threshold. A setting of 1:1 (I/P is to O/P) will have no effect on the signal. A ratio of 10:1 will require a 10dB change in I/P level to produce a 1 dB change in O/P level.
Setting a ratio of 2:1 will mean that for every 2dB of signal that is above the threshold going into the compressor, only 1dB will come out.
Ableton Compressor at 4:1 Ratio
Output Level / Makeup Gain
Turning up this control will raise the overall signal after it has been compressed.
The signal passing through the compressor is subject to the compression action before the O/P gain is made up.
It’s important to realise that altering O/P gain will affect the signals below threshold as well as those above. The idea of raising the overall O/P level after compression is to return the peak level to its original maximum. This is important to ensure correct gain structure through the rest of the signal path.
If the unit is compressing the signal by 5dB, you need to set your output/gain to +5dB
In use, the amount of gain reduction a compressor provides will vary from moment to moment. The amount of gain reduction does not need to be calculated manually as it will be displayed on a level meter (i.e. a gain reduction meter).
Typically, the I/P & O/P metering are used to assist with this – after the required amount of GR has been dialled in, the I/P level is checked to see where it’s peak is. Then, the O/P level is check & the Make-up gain adjusted till I/P & O/P are well matched.
Compressing a signal makes its average levels higher and therefore makes them sound louder.
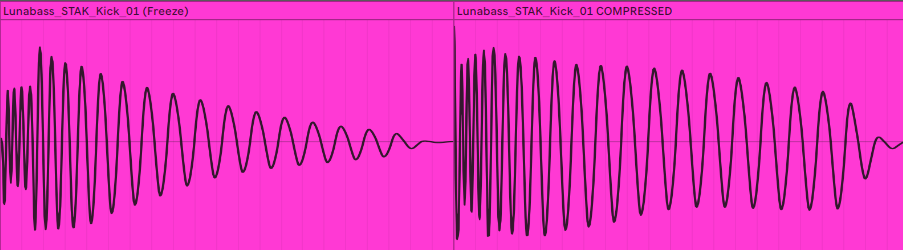
Example 1:
Before compression (left A) and after compression (right B) of a 909 kick drum that’s been very heavily compressed. Signal A has a larger dynamic range than Signal B but will sound quieter as B has a higher average level. B will also exhibit a bass increase as the lower frequency levels in the drum tail have been increased.
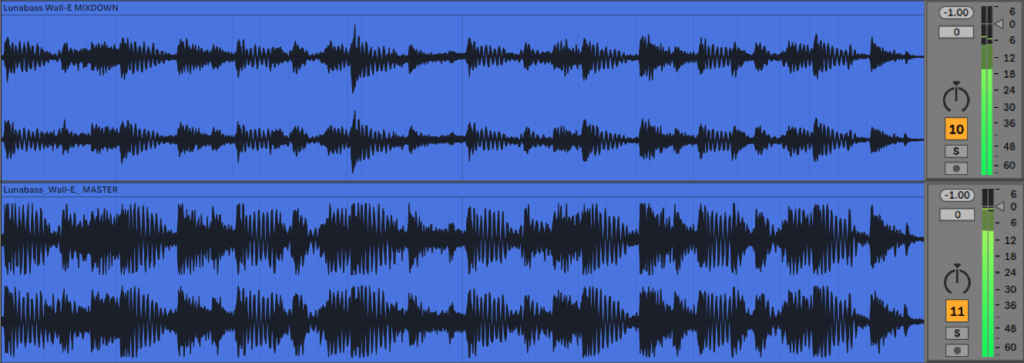
Example 2:
Below, 2 examples of the same song, mixdown before compression (top A) and as a master with compression and limiting (bottom B). Note that both versions show a peak level of -1dBFS. B has a higher ave level and will therefore sound louder.
Attack & Release
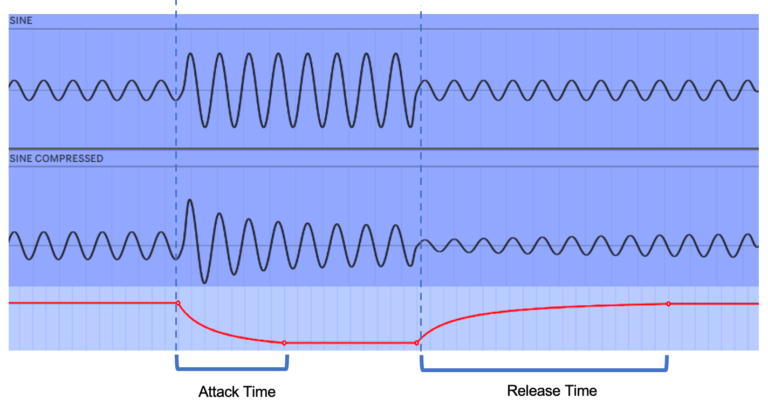
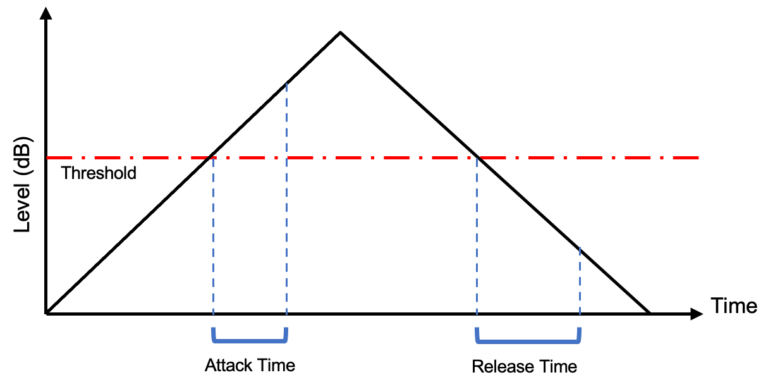
Attack: This control is usually measured in milliseconds (ms). The attack sets the compressors “reaction time “to a signal that goes above threshold. The attack time is the time it takes for the compressor to start compressing once the signal goes above threshold
Setting the attack time too quickly may result in the compressor reducing the gain too fast which you would be able to hear working (this effect is called “Pumping” – the effect of the fast changes in program level are audible). It may also mean that the initial (transient) part of the signal is compressed regardless
A slower attack time would mean that the effect is more gradual and progressive and sound more natural to the listener.
Setting an attack time too slowly however, could mean that the compressor actually misses the signal peak it is trying to reduce (i.e. the signal rises above the threshold and falls back below before the compressor has had time to do anything about it).
Ideally, an attack time will be set fast enough to actually attenuate a signal but not so fast that it is noticeable
Where exactly you set the attack control will depend on the envelope of the sound you are compressing.
Fast attack sound = a faster attack time. Slow attack sound = a slower attack time
Release
This control will usually be measured in seconds. It controls how quickly the compressor will allow the signal to be turned back up once the signal is back below the threshold.
The release time will determine how long it takes the compressor to “let go” of the signal. It will be adjustable from approx. 20ms to 2 seconds
Setting release time too short may cause the volume to be turned up too quickly which can produce a noticeable effect known as the “Breathing” – a rapid rise in the background noise level which can sound like someone take a quick breath in
Setting a release time too long however may mean that the compressor ends up compressing the signal even after it drops below the threshold (holds it for too long) compressing signals that did not actually exceed threshold on their own.
Other Compressor Controls
As well as the 5 main controls on a compressor you may also find the following.
Auto – this sets the attack and release time automatically & is typically program dependant. This setting is particularly useful if you are compressing complex program material & therefore the attack & release needs to be different from moment to moment. Percussion especially should have its attack and release set manually – auto is normally too slow.
Peak Level Detection – the compressor acts on any signal that exceeds threshold.
RMS Level Detection – the compressor commences operation when the average program level exceeds threshold.
Side-chain – access to the detector circuit enabling compression to be triggered by an external signal.
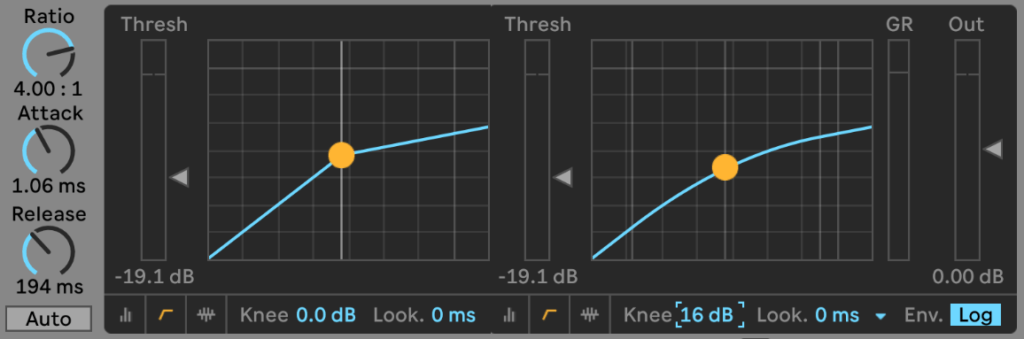
Hard Knee Mode –This mode is the normal compressor mode – when the signal is above the threshold, it will compress it, immediately at the full ratio setting. when it is below the threshold it won’t compress it at all, i.e, it will not apply any GR.
Soft Knee Mode – In this mode the compressor will actually begin to compress the signal just below the threshold (up to 10 dB below) but by a lesser ratio to the one you have set. It will start off at 1:1 & ‘roll over’ to the full amount of the ration by the time it reaches the threshold. This makes a sounds’ compression more gradual and subtle. Using this mode makes compression smoother, especially when you have set a high ratio. It’s typically used for vocals
2 compressors setup with Hard Knee (left) and Soft Knee (right)
Audible Artefacts (Side Effects)
The most noticeable are called “breathing” and “pumping”.
If an amplifier is forced to rapidly fluctuate its gain value, the low-level program noise is also fluctuated. This effect is often audible and is termed breathing. If the return to unity gain is slower, the noise rise is much less noticeable.
“Pumping” effects are the rapid fluctuation in actual signal level (music). If these occur too quickly, they can also be audible.
Below is a guide that can help as a starting point. Whilst the screenshots in this guide are based on Ableton Live, the same concepts can be applied to any DAW.
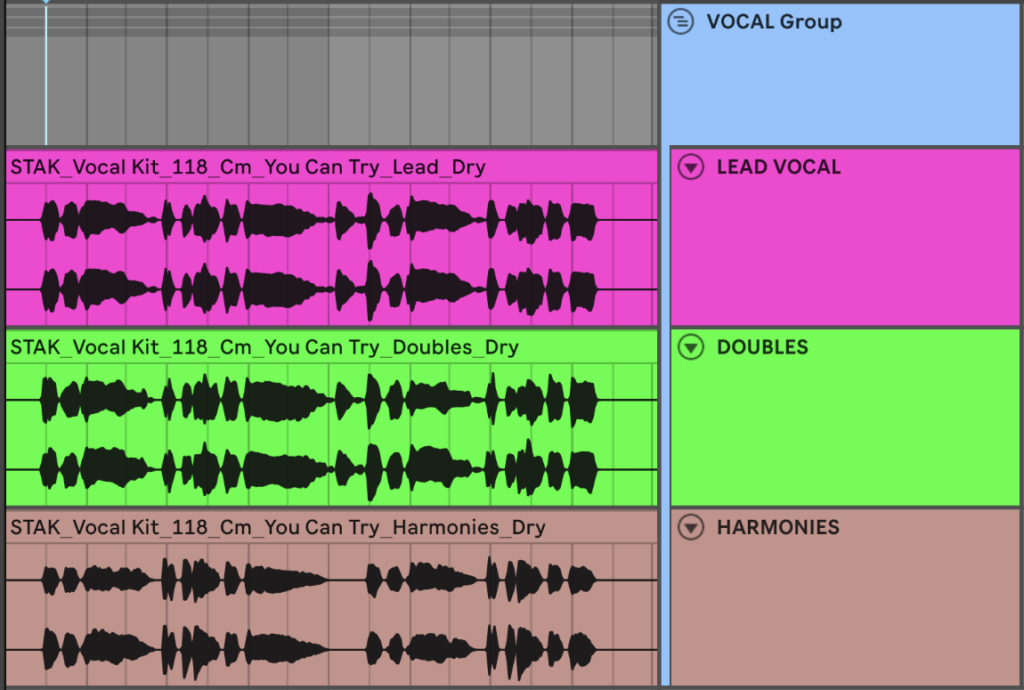
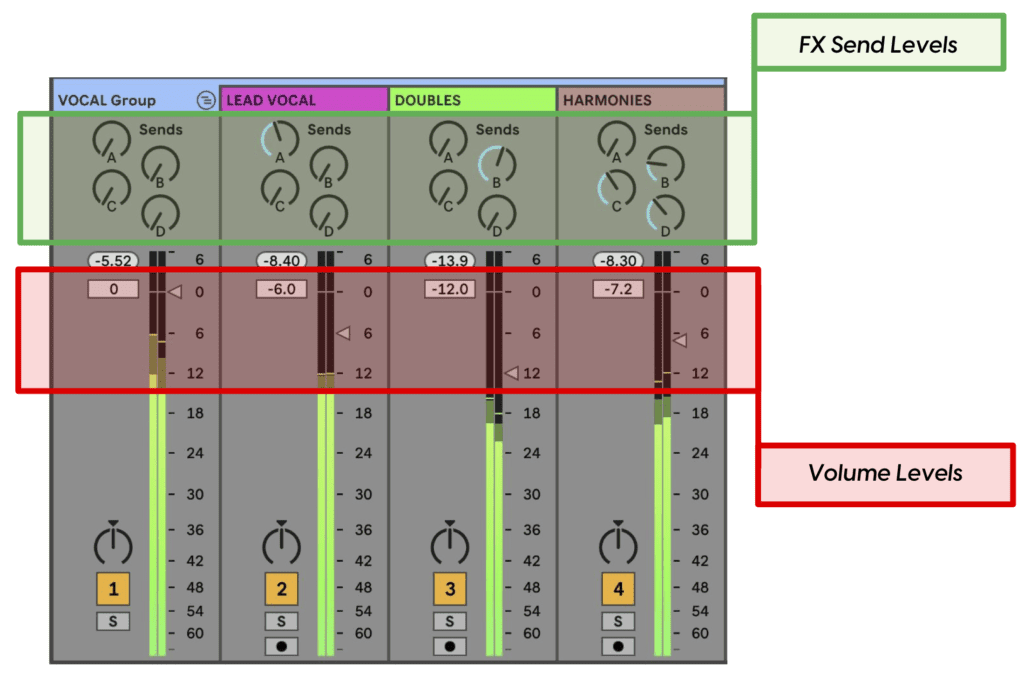
In this instance, we are mixing with the Dry Lead, Doubles & Harmony layers. Each layer is placed within its own audio track, with all 3 audio tracks routed to a group (Vocal Bus) track.
Lead Vocal: This is the main focus of the vocal mix; any other layers are mixed around it. Give the lead vocal plenty of headroom; try setting its level between -6 to -12 dB.
Doubles: These help to thicken the Lead Vocal and can add a sense of width. Our Doubles consist of 2 extra vocal layers, the width has been created by panning each layer left or right.
Bring the Doubles up in level until the required effect is achieved. Our Doubles will sound quite natural around 6-7dB lower than the Lead. There are no rules here, so think of this as a good starting point. Higher Doubles levels will give the effect of more width, so play with the Lead & Doubles balance. If a more mono sound is required, try reducing the left & right pan amounts.
Stak: If you can’t decide on the mix balance for the Lead and Doubles, we also supply a Stak layer. This is our mix of the Lead and Doubles together (dry or wet).
Harmonies: Add additional voices (notes) simultaneously to the vocal melody. In general, vocal harmonies may be sung by the lead vocalist over multiple takes or by backing vocalists live. The harmony will fit an underlying chord structure. They can transform a Vocal Kit. Bring the harmonies up in level until the required effect is achieved.
The harmonies can also be used on their own as a completely different vocal section, whether it be as a different Lead Vocal, or for unique vocal chops
Panning: Although we’ve taken care of panning during our mixing stage within the Double & Harmony layers, pan any layer wherever the hell you like!
EQ & Compression: The beauty of multiple layers is that you can treat each one exactly how you want them. All of our layers have been EQ’d and compressed, but that doesn’t mean you can’t radically alter the tone and dynamics to suit your needs.
For many producers, subtle Vocal Group (Bus) compression may be all you need. Below are some settings that you may find useful. Notice that the attack and release aren’t set too fast, to allow the vocals to move naturally.
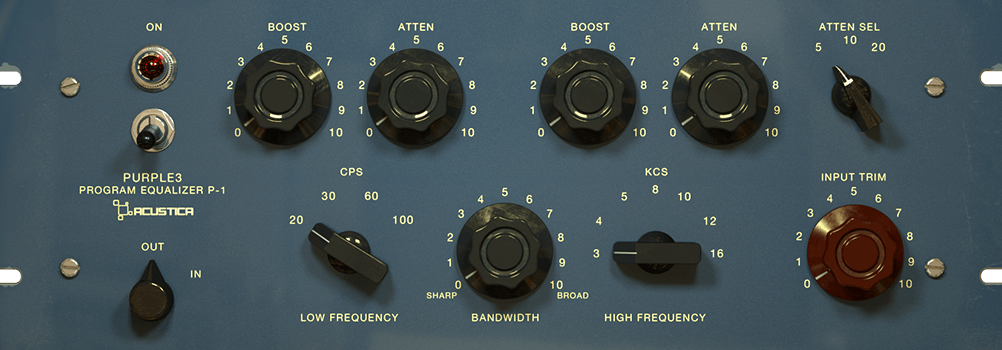
And to anyone interested, our favourite EQ tools include: