Our Top-3 Favourite Reverb Effects.
Reverb is such an important effect, it brings a sense of space and helps to get the most out of your mixes. At STAK we have a few favorite reverb effects that make it into most of the music and vocals we create. We thought it was about time we took you through our Top-3 Reverb Effects. Whatever reverb you choose, take the time to learn its intricacies, your mixes will thank you for it!
Producer Tip: when using reverb, it’s better to err on the side of caution. Too little is nearly always better than too much. This way, the reverb will support, rather than overwhelm, the dry tracks.
Fabfilter Pro-R
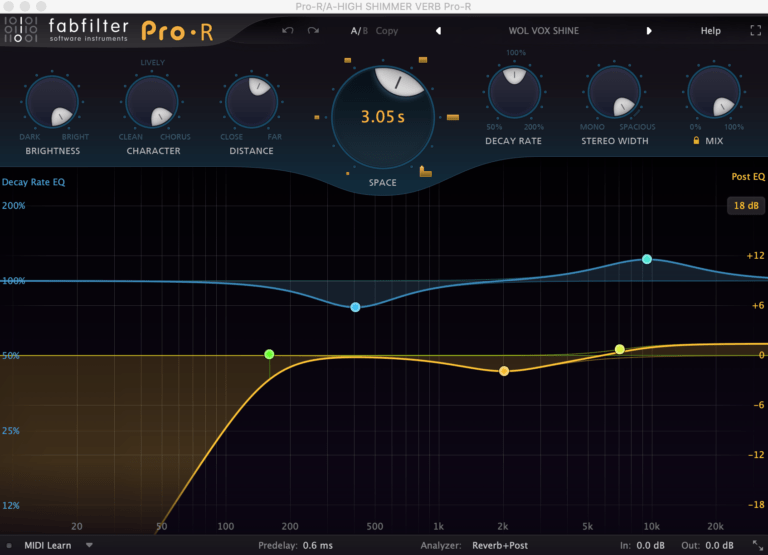
Fabfilter Pro-R: A lovely sounding reverb with a pristine, rich & smooth sound. It has a lot of flexibility without being too difficult to use. It has a Decay EQ and Post EQ section that allows the reverb to be easily sculpted. This is our go to reverb for longer (3-second and above), brighter, shimmering reverbs.
Valhalla Plate
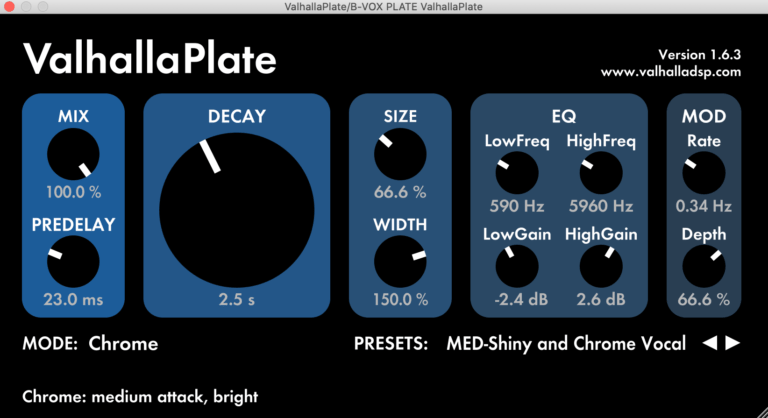
Valhalla Plate: Perfect in many situations, plate reverbs give a bright and smooth reverb. We often use Plates on Vocals and Snare drums. See the section on Hardware Plate Reverb below
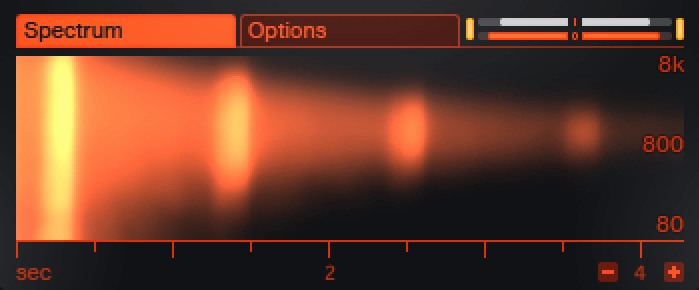
Native Instruments RC24

Native Instruments RC24: A re-creation of one of the most famous digital reverbs, the Lexicon 224. It was released in 1978 and was used on a large number of influential albums and singles through the 80’s & 90’s. We love it on synthesizers and anywhere that’s in need of a bit of 80’s digital vibe.
Reverberation – Introduction
In order to create a sense of space in audio recordings, reverb is often added to signals such as voice and instruments. Often, sounds are recorded with close microphone techniques, resulting in a lack of natural reverb.
To compensate, an approximation of reverb can be added to the mix through an effects unit. However, excessive use of reverb can cause sounds or entire mixes to become unclear and muddy.
Reverb is characterized as repeating sound waves that become increasingly denser (closer), and weaker over time in an enclosed space. This results in a density of echoes that cannot be distinguished from one another.
Sends & Returns
Effects (FX) such as Reverb & Delay are typically added to a split or copy of the signal. The FX is applied to this split/copy and then mixed back in with the original signal. This is commonly referred to as the Send and Return technique. The split or copy is “Sent” to the FX unit, the FX is added to the signal and then the FX signal is “Returned” to the mix.

Making a split or copy of a signal usually involves the use of a mixing console (virtual or physical) with the FX applied to a signal via a software plug-in or hardware fx unit.
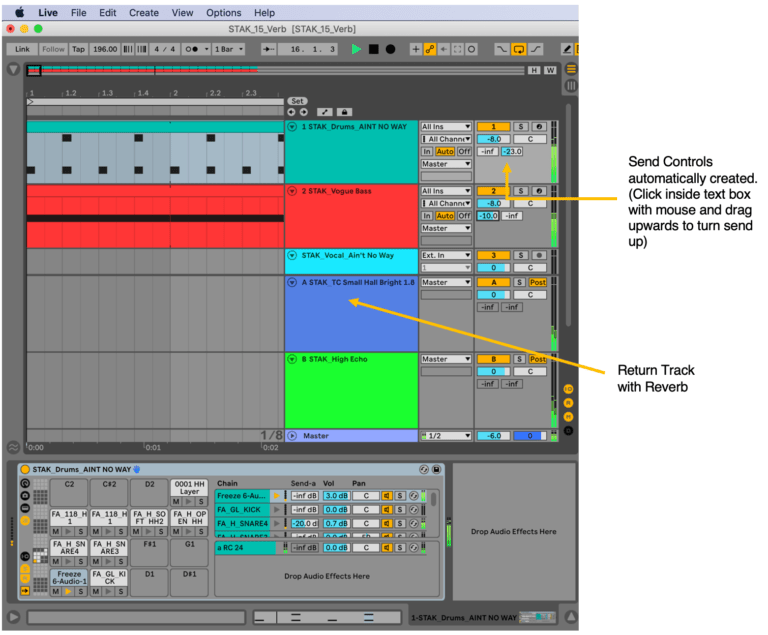
Ableton Live Mixer – Send and Return Set-up
Setting up Send and return FX in Live is also relatively easy and parts of the process are automated for you:
- In live, simply go to the Create menu and choose “Insert Return Track.
- The Send knobs for that Return track will be automatically created on all other tracks.
- Drag the effect you require onto the Return Track.
- Ensure the effect is set to 100% Wet.
- Turn the Send Knob up on the track/s requiring the effect.

A software plug-in, will contain many factory presets. These are effects that have been pre written by the manufacturer and can be used straight away. In most cases the presets themselves will have a number and title that best describes what sort of effect it is.
All of these presets will have editable parameters. A parameter is an aspect or part of an effect that can be altered by the user. The parameter for a program will change depending on the type of effect.
Digital Reverberator Parameters
- Type – plate, hall, room, spring, gated, non-linear.
- Decay – the time taken for the reverberant field to fade out.
- Pre-delay – the time difference between the direct sound and the first arriving reflection.
- Early Reflections – the first and strongest reflections, usually not perceptible as individual reflections.
- Density – the number of reflections over a given time period. Density increases with time. High density produces a thicker sounding reverb.
- Diffusion – the smearing of transients caused by multi-directional reflections. High diffusion produces a smoother sounding reverb.
- HF/LF Decay Ratio – the relative decay rates of HF and LF. Natural acoustic environments tend to absorb HF more readily than LF.
- Bandwidth – the frequency range of the reverb.
.
Tips for Using Reverb
Reverb and delay are standard effects used in mixdowns, but they can seem overwhelming to musicians who are still learning the basics of studio production.
The variety of devices available and their different editing parameters are two main aspects contributing to this confusion.
Starting with a Preset. If you don’t know where to start, use a preset. There’s often a preset that comes close to the sound you want.
If you’re not sure what sound you’re aiming for, imagine what kind of space you’d like your mix to inhabit: big, small, or a specific type of environment.
You may have to go through several presets before finding the right fit for your mix. Be careful with presets that produce a metallic sound, especially in response to noisy tracks like drums. Metallic resonance can make the effect sound too obvious and unpleasantly color the mix as a whole.
Be cautious with reverbs that have prominent frequency extremes when looking for something that will gel and bring your mix together. Very high frequencies make the reverb too audible, and very low frequencies reduce punch at the low end of the mix where definition is crucial.
Adjusting the Reverb. Assuming you now have a useable preset, you may now wish to tweak it to make it exactly right for your track. Some reverb parameters end up being much more useful than others, so here are a few pointers for getting the quickest results.
Once you have a suitable preset, you can tweak it to fit your track precisely. Some of the controls that will help you get the quickest results are:
Length: Adjusting the length of the reverb is crucial for achieving the perfect balance across all tracks. Too long and the reverb will wash away definition and clarity within your mix. Too short and it may feel unnatural. Experiment with different settings to find the best balance.
Tone: A separate equalizer following the reverb in the return channel usually provides greater flexibility than the built-in equalization controls of the reverb processor. That way, you can cut high or low frequencies further, sculpting return channel tonality to make it blend seamlessly into the mix.
Pay close attention to the amount of lower frequencies below 300hz and above 10kHz
Pre Delay: Another reverb parameter that you can adjust is the pre-delay setting, which delays the onset of the reverb reflections by a specific amount. Pre Delay can be helpful to separate the dry sound from the reverb, and gaining definition.
More Than One: Using more than one reverb in the mix is an effective tool to achieve the desired soundscape. The shorter reverb blends tracks together more convincingly, while the longer reverb gives a sense of acoustic space. You can use the mix of both reverbs to deal with various situations.
Tips: Typically, I’ll have short, medium and long reverbs within a mix.
Personally, I rarely apply reverbs to low frequencies.
Lastly, when using reverb, it’s better to err on the side of caution. Too little is nearly always better than too much. This way, the reverb will support, rather than overwhelm the dry tracks.
Hardware Reverb Types
Acoustic echo chamber. The following video from Waves summarises the Studio-2 chamber at Abbey Road Studios and their re-creation of it: https://www.youtube.com/watch?v=kWSxWztDxf4
Plate reverb unit. The device’s foundation is a steel plate measuring around 2 meters in length, 1 meter in height, and 0.4mm in thickness. The plate is positioned upright within a framework and is tensioned with precision. A driver, resembling a loudspeaker, is centrally mounted to induce vibrations on the plate’s surface. These vibrations propagate throughout the plate and are reflected back from its edges. The mechanical movement is then converted into an audio voltage by a vibration pick-up at either end of the plate. The length of time the vibrations persist can be regulated by adjusting the position of felt dampers located on the plate’s surface.
Spring reverb unit. Were designed as a cheaper alternative to the plate. The following gives an excellent overview of their make-up. They have adistinct sound and were very popular in genres like dub-reggae.: https://www.amplifiedparts.com/tech-articles/spring-reverb-tanks-explained-and-compared.