General Vocal Compressor Setup
For a vocal, try the following:
- Set Threshold to maximum (all the way up)
- Set Ratio dial to 4:1
- Set Attack to 5ms
- Set Release time to 150ms
- Alternatively set to AUTO which will set attack and release automatically.
- Loop a quiet part or phrase within the vocal.
- Gradually lower the threshold dial until the unit is just starting to compress the signal by 1-3dB
- You can monitor this on the gain reduction meter.
- Play through the vocal performance and go for around 6-10dB of gain reduction during the loudest passages.
- Turn up the Output / Gain to +7 or +8dB to add back the level compression took out.
The following is a series of steps to make general compressor settings that will work on many different sound sources, or at least be a good starting point.
- Set Threshold to maximum (all the way up)
- Set Ratio dial to 2:1 (an average ratio – for every 2dB above,1dB attenuated)
- Set Attack to 20ms (average)
- Set Release time to 200ms (average)
- Alternatively set to AUTO which will set attack and release automatically
- Gradually lower the threshold dial until the unit is compressing the signal by 6-8dB
- You can monitor this on the gain reduction meter
- Turn up the Output / Gain to +7 or +8dB to add back the level compression took out.
Exactly what threshold, attack, ratio, release and output settings you use on a compressor will vary depending on what type of signal you are processing.
Common Compressor Settings
The table below lists some common compressor settings that suit various purposes.
Try spending some time playing with the suggested settings to produce the sound quality described in the Audio Source column. (Be realistic: don’t try to turn a terminally flabby kick drum into a tight, punchy one).
How to use the settings
- Pick a sound source.
- Insert a compressor and dial up your chosen settings.
- Reference between the processed and unprocessed sounds. (Remember to set the output gain to compensate for the level drop caused by compression).
Does the compressed sound match the description? The settings are starting points and will most likely need to be adjusted to your source. It would be a worthwhile exercise to take a fairly neutral source and try each of the settings recommended to pull different sounds.
Audio Source | Attack ms | Release ms | Ratio | Knee | Gain Reduction |
Vocal Control | Fast | 200 | 4 : 1 | Hard/Soft | 5 – 10 |
Vocal Aggressive | Fast – 5ms | 40 – 100 | 6-8 : 1 | Hard | 5 – 15 |
Bass Guitar Gentle | 4 | 120 | 2.5 : 1 | Soft | 3 – 10 |
Bass Guitar – Enhance Note Attack | 16 | 80 | 4 – 1 | Hard | 5 – 10 |
Kick Drum – Tight & Punchy | 16 – 50 | 300 | 4-8 : 1 | Hard | 5 – 10 |
Kick Drum Gentle | 16 – 50 | 300 | 2 : 1 | Hard/Soft | 6 – 6 |
Snare Thick | Fast | 100 | 6 : 1 | Hard | 5 – 10 |
Snare Snap | 20 – 40 | 100 | 4-8 : 1 | Hard | 5 – 10 |
Elec Guitar | 15 | 60 | 8 : 1 | Hard | 5 – 10 |
Drum Group (Bus) Gentle Control | 2 | 300 | 1.5-2.5 : 1 | Soft | 2 – 6 |
Drum Group (Bus) Squashed Vibe | 2 | 100 – 200 | 10 : 1 | Hard | 5 – 15 |
Mix Bus – Gentle | 50 – 150 | 300 | 1.5-2.5 : 1 | Soft | 2 – 6 |
Compressors & Limiters
A compressor works like an automatic volume controller.
A compressor affects the level (amplitude) of a signal, whereas an EQ will change the tone or frequency balance. A compressor is classed as a dynamic signal processor or Amplitude Domain processor.
A compressors main function is to reduce the dynamic range (DR) of a signal. The dynamic range of a signal is defined as the ratio of the loudest peak to the quietest, expressed in decibels (dB).
A compressor is used for a number of reasons:
- The musicians performance may vary widely. Inconsistent drummers, bass players & vocalists often need help to get their signals/sounds to sit evenly in a mix.
- For creative reasons. Compressors (limiters & expanders) can be used to radically change the dynamic envelope of a signal. This allows us to take a sound & completely warp it dynamically. Sounds can be made so completely different they are unrecognisable.
Compression may take 3 possible forms:
- Using Compressors and Limiters – Both are devices which restrict dynamic range. A limiter is simply a more severe compressor.
- Manual Gain (Fader) Riding – The engineer follows the dynamics of the piece of music as it is played, reducing the fader level when peaks occur and increasing the fader level in the quiet parts of the program. This method is commonly used but is not fool proof. It requires considerable practice & a good deal of intuition.
- Restricting Dynamics in Performance – The musicians restrict their own dynamic range. The success of this depends on their skill. Also, tonal colouration will often be affected.
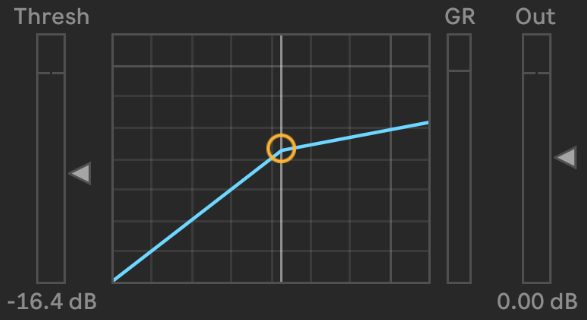
Compressor Definition: An amplifier whose gain decreases as it’s input level increases above the threshold.
Limiter Definition: is an amplifier (compressor) whose output level remains constant regardless of how high the input level exceeds the threshold by. Limiting is the most severe form of compression.
When an incoming signal goes above a certain signal level (the threshold), the compressor will turn the signal level down. It will reduce the level of signals above that threshold level.
When the signal going in drops in level (back below the threshold), the compressor will leave the signal alone – it may change the signals level according to the setting of the ‘Make-up gain’ (also called O/P level) but this will be by a fixed amount & most importantly, the DR won’t be modified below threshold.
When a signal is being compressed, its volume is being lowered but the average ‘Density’ of the mix is being increased – the softer & louder signals are being brought closer together – the dynamic difference between the 2 is reduced. The overall level can then be brought back up to the same peak level as before compression using the Make-up or Output Level control. This has the effect of raising a signals “Average Loudness”.
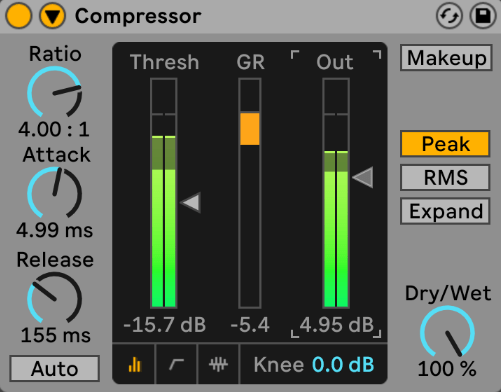
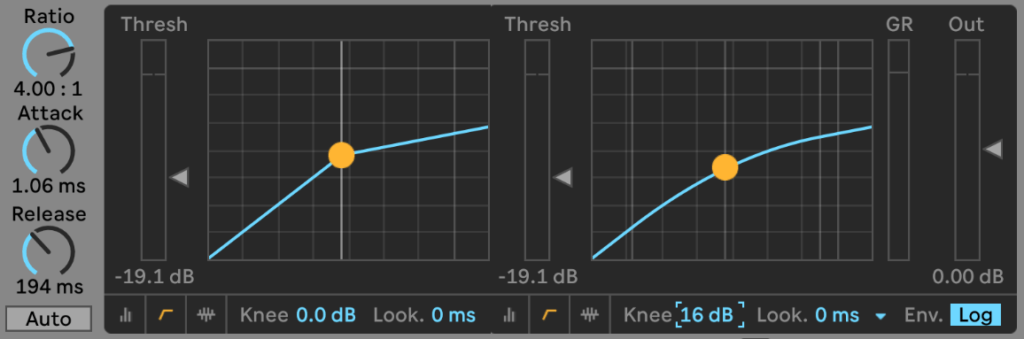
Compressor Controls
Most compressors will have 5 main controls
- Threshold
- Ratio
- Output (make-up gain)
- Attack
- Release
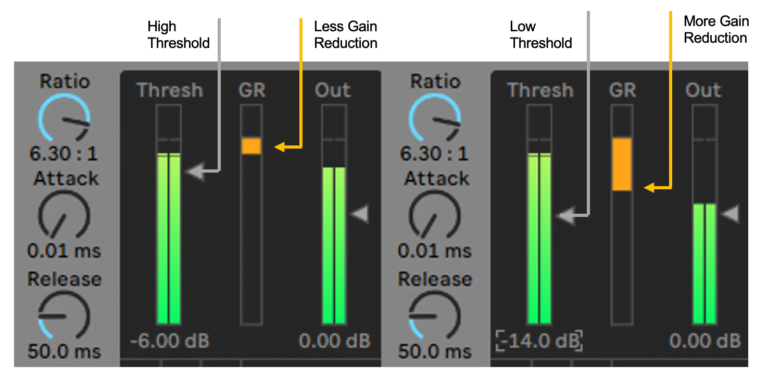
Threshold
Sets the level above which the compressor starts to turn the signal down (i.e. compress it)
Set the threshold high – not much of the audio signal will be compressed.
Set the threshold low – most of the audio signal will be compressed.
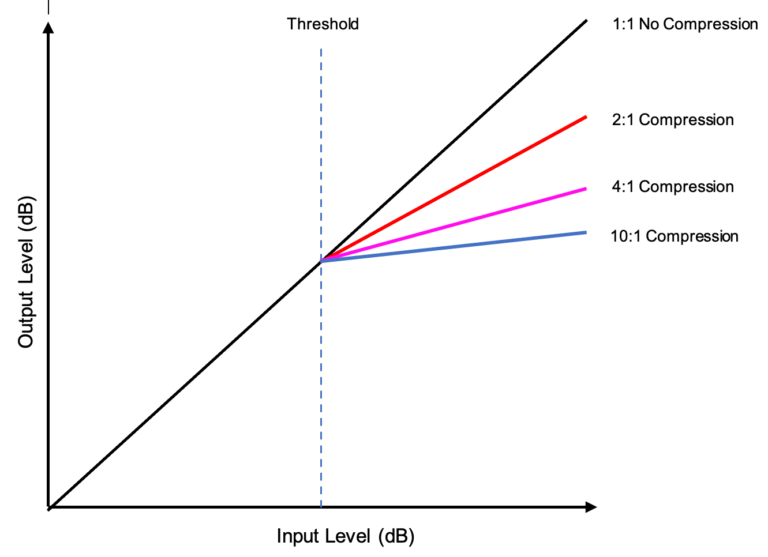
Ratio
This dial will determine how much a signal above the threshold will be attenuated by.
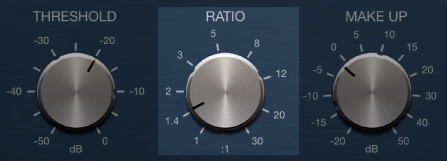
The higher the ratio, the more a signal is compressed above threshold. A setting of 1:1 (I/P is to O/P) will have no effect on the signal. A ratio of 10:1 will require a 10dB change in I/P level to produce a 1 dB change in O/P level.
Setting a ratio of 2:1 will mean that for every 2dB of signal that is above the threshold going into the compressor, only 1dB will come out.
Output Level / Makeup Gain
Turning up this control will raise the overall signal after it has been compressed.
The signal passing through the compressor is subject to the compression action before the O/P gain is made up.
It’s important to realise that altering O/P gain will affect the signals below threshold as well as those above. The idea of raising the overall O/P level after compression is to return the peak level to its original maximum. This is important to ensure correct gain structure through the rest of the signal path.
If the unit is compressing the signal by 5dB, you need to set your output/gain to +5dB
In use, the amount of gain reduction a compressor provides will vary from moment to moment. The amount of gain reduction does not need to be calculated manually as it will be displayed on a level meter (i.e. a gain reduction meter).
Typically, the I/P & O/P metering are used to assist with this – after the required amount of GR has been dialled in, the I/P level is checked to see where it’s peak is. Then, the O/P level is check & the Make-up gain adjusted till I/P & O/P are well matched.
Compressing a signal makes its average levels higher and therefore makes them sound louder.
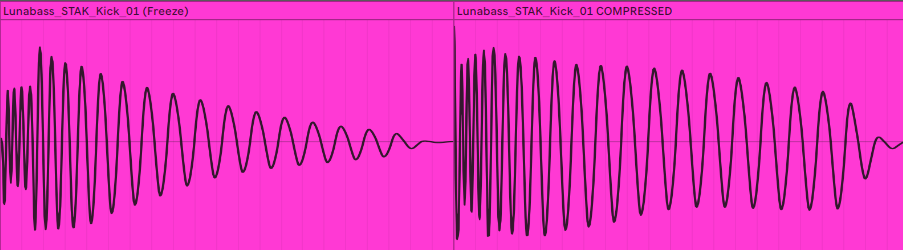
Example 1:
Before compression (left A) and after compression (right B) of a 909 kick drum that’s been very heavily compressed. Signal A has a larger dynamic range than Signal B but will sound quieter as B has a higher average level. B will also exhibit a bass increase as the lower frequency levels in the drum tail have been increased.
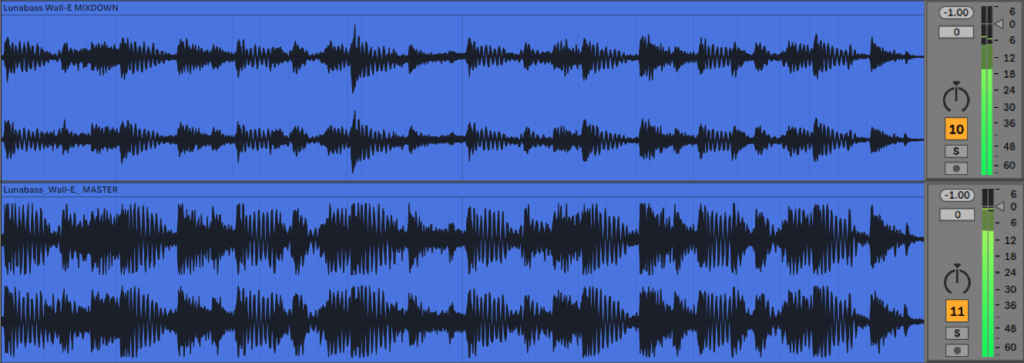
Example 2:
Below, 2 examples of the same song, mixdown before compression (top A) and as a master with compression and limiting (bottom B). Note that both versions show a peak level of -1dBFS. B has a higher ave level and will therefore sound louder.
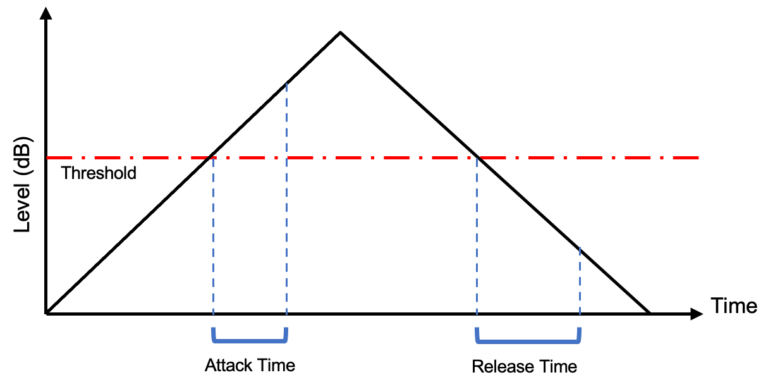
Attack & Release

Attack: This control is usually measured in milliseconds (ms). The attack sets the compressors “reaction time “to a signal that goes above threshold. The attack time is the time it takes for the compressor to start compressing once the signal goes above threshold
Setting the attack time too quickly may result in the compressor reducing the gain too fast which you would be able to hear working (this effect is called “Pumping” – the effect of the fast changes in program level are audible). It may also mean that the initial (transient) part of the signal is compressed regardless
A slower attack time would mean that the effect is more gradual and progressive and sound more natural to the listener.
Setting an attack time too slowly however, could mean that the compressor actually misses the signal peak it is trying to reduce (i.e. the signal rises above the threshold and falls back below before the compressor has had time to do anything about it).
Ideally, an attack time will be set fast enough to actually attenuate a signal but not so fast that it is noticeable
Where exactly you set the attack control will depend on the envelope of the sound you are compressing.
Fast attack sound = a faster attack time. Slow attack sound = a slower attack time
Release
This control will usually be measured in seconds. It controls how quickly the compressor will allow the signal to be turned back up once the signal is back below the threshold.
The release time will determine how long it takes the compressor to “let go” of the signal. It will be adjustable from approx. 20ms to 2 seconds
Setting release time too short may cause the volume to be turned up too quickly which can produce a noticeable effect known as the “Breathing” – a rapid rise in the background noise level which can sound like someone take a quick breath in
Setting a release time too long however may mean that the compressor ends up compressing the signal even after it drops below the threshold (holds it for too long) compressing signals that did not actually exceed threshold on their own.
Other Compressor Controls
As well as the 5 main controls on a compressor you may also find the following.
- Auto – this sets the attack and release time automatically & is typically program dependant. This setting is particularly useful if you are compressing complex program material & therefore the attack & release needs to be different from moment to moment. Percussion especially should have its attack and release set manually – auto is normally too slow.
- Peak Level Detection – the compressor acts on any signal that exceeds threshold.
- RMS Level Detection – the compressor commences operation when the average program level exceeds threshold.
- Side-chain – access to the detector circuit enabling compression to be triggered by an external signal.
- Hard Knee Mode –This mode is the normal compressor mode – when the signal is above the threshold, it will compress it, immediately at the full ratio setting. when it is below the threshold it won’t compress it at all, i.e, it will not apply any GR.
- Soft Knee Mode – In this mode the compressor will actually begin to compress the signal just below the threshold (up to 10 dB below) but by a lesser ratio to the one you have set. It will start off at 1:1 & ‘roll over’ to the full amount of the ration by the time it reaches the threshold. This makes a sounds’ compression more gradual and subtle. Using this mode makes compression smoother, especially when you have set a high ratio. It’s typically used for vocals
Audible Artefacts (Side Effects)
The most noticeable are called “breathing” and “pumping”.
If an amplifier is forced to rapidly fluctuate its gain value, the low-level program noise is also fluctuated. This effect is often audible and is termed breathing. If the return to unity gain is slower, the noise rise is much less noticeable.
“Pumping” effects are the rapid fluctuation in actual signal level (music). If these occur too quickly, they can also be audible.
Compressor Reference
FL Studio: Fruity Limiter + Compressor + Gate.
Presonus: Compressor
Apple Logic Pro: Compressor
Pro Tools: Pro Compressor
Ableton Live: Glue Compressor