Vocals – Let’s cut (or boost) to the chase
The frequency ranges listed, highlight common areas for correcting or enhancing vocals with EQ. If you’re new to EQ, please see the main EQ guide sections.
- 100-250Hz – Boosting gives the vocal a more “in your face” type of sound
- 250-800Hz – Muddiness
- 400-800Hz – Boxiness
- 500-1kHz – Nasal
- 3kHz – Critical, boost for vox clarity
- 1-6kHz – Presence
- 6-8kHz – Clarity BUT Sibilants
- 8-12kHz – Brightness and Air
What is Equalisation (EQ)
Equalisation is a process commonly used to adjust the frequency balance of an audio signal. A basic form of EQ are the bass and treble controls of a hi-fi system. Equalisers adjust the volume (amplitude) of a particular set of frequencies effectively making them frequency specific volume controls. In the studio we generally use a complex set of EQ controls giving the engineer ways of targeting very specific frequencies. EQ can be thought of as a corrective or creative process.
Reasons to EQ
There are varied reasons for requiring the application of EQ.
- Instrument blending. In the mix it is common practise to use EQ to reduce frequencies that clash or to make room for certain instruments (i.e. increasing separation between instruments – Kick drum and Bass Synth).
- Cutting out unwanted sound, mouth clicks and pops, background noise and hiss.
- Make up for deficiencies in a signal caused by poor instrument choices or poor microphone technique.
- To emphasize the good parts of a signal.
- To create a special effect.
- Adjusting the character of a sound (tonal balance)
- Matching a sound to a previous mix or overdub.
When to EQ
EQ’ing a signal can be done at any stage of the recording or mixing process.
- Initial Recording.
- Song writing
- Overdubbing (adding to the original recording).
- Mixing
- Mastering.
There are no rules as to when the best time to EQ a signal is.
Waiting until the mixdown stage will give you more of an idea as to the general content of the sounds you will have to combine together. However, EQ’ing during recording means that you can EQ a second time during mixdown and hopefully improve it further.
It is important to remember that EQ’ing straight to Disk or tape during recording can’t be undone.
85-90dBSPL is a good level to listen to signals when applying EQ. Too low a volume level may give you a false impression and start to sound worse when played back at higher volumes.
Within a room, the size, shape, speakers used and materials in the room will all affect the amount and type of EQ’ing applied.
How to find Problem Frequencies
To find an EQ point with a sweep equaliser, apply maximum boost and sweep the frequency range until the desired or undesired frequency becomes obvious. If boost is employed in all, or nearly all, bands, the effect is the same as raising the fader.
EQ Types
Shelving EQ
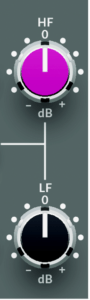
The most common form of shelving EQ is the simple bass and treble dial. On a mixing console, like the Solid State Logic SiX mixer on the left, these will typically be labelled as HF & LF.
On the SiX, the amount of cut/boost in dB & shelving points are not stated on the device.
Its Shelving points are as follows:
• HF: 3.5 kHz.
• Bass: 60 Hz.
These are adjustable with + 15 to -15 dB of gain
The low frequency shelving point of 60Hz means that all frequencies below 60Hz will be boosted or cut by the amount on the LF control. The high frequency shelving point of 3.5kHz means that all frequencies above 3.5kHz will be boosted or cut by the amount on the dial.
80Hz & 12kHz are common shelving points as are 100Hz and 10kHz.
The following example shows a graphic representation of the shelving point for the low frequency dial at 80Hz with 10dB of gain.
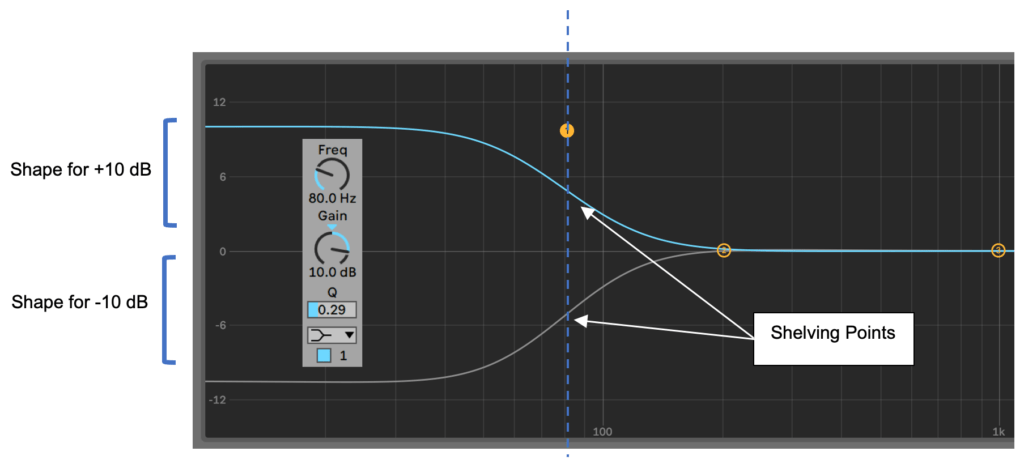
The dashed line indicates the shelving point at 80Hz. Note that some of the frequencies above (to the right of the dashed line) are also affected. It is also worth noting that some frequencies just below the 80Hz shelving point have not reached a uniform boost or cut. It is important to keep this effect in mind when using any type of EQ as you may be inadvertently changing frequencies that you do not wish to change.
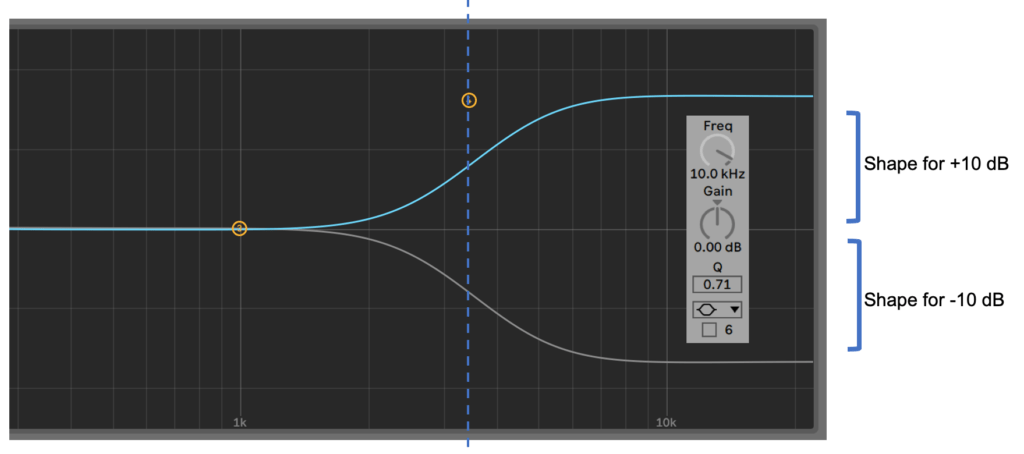
Below is the hi shelf equivalent with the shelving point set to 10kHz for adjustment of high frequencies.
Note that this type of shelving EQ, as found on the SiX, has a fixed shelving point. This means you will not be able to adjust where the shelving points are set. You only have control over how much cut or boost you apply.
Parametric Shelving EQ.
A parametric shelving EQ gives you much more control. It gives you control over the shelving point and the steepness of the EQ curve, typically labelled Q.
In the Ableton EQ8 example below, the Low Shelf is cutting and High Shelf boosting. In this example, we are able to adjust the shelving point. This means we can control at what point in the frequency range we are applying cut or boost.
The Q control gives us the ability to adjust the steepness of the EQ’s curve.
Parametric EQ
A parametric EQ allows you to vary the gain amount, the centre frequency and the bandwidth of the frequencies that are being cut or boost. Unlike a shelving EQ, parametric deals with centre frequencies with the EQ curve resembling more of a bell shape than a shelf.
There are 3 dials per band on a parametric EQ
- Gain – Measured in decibels (dB)
- Centre frequency – Measured in Hertz (Hz)
- Q (Bandwidth). The bandwidth is generally referred to as the Q value or is sometimes measured in octaves.
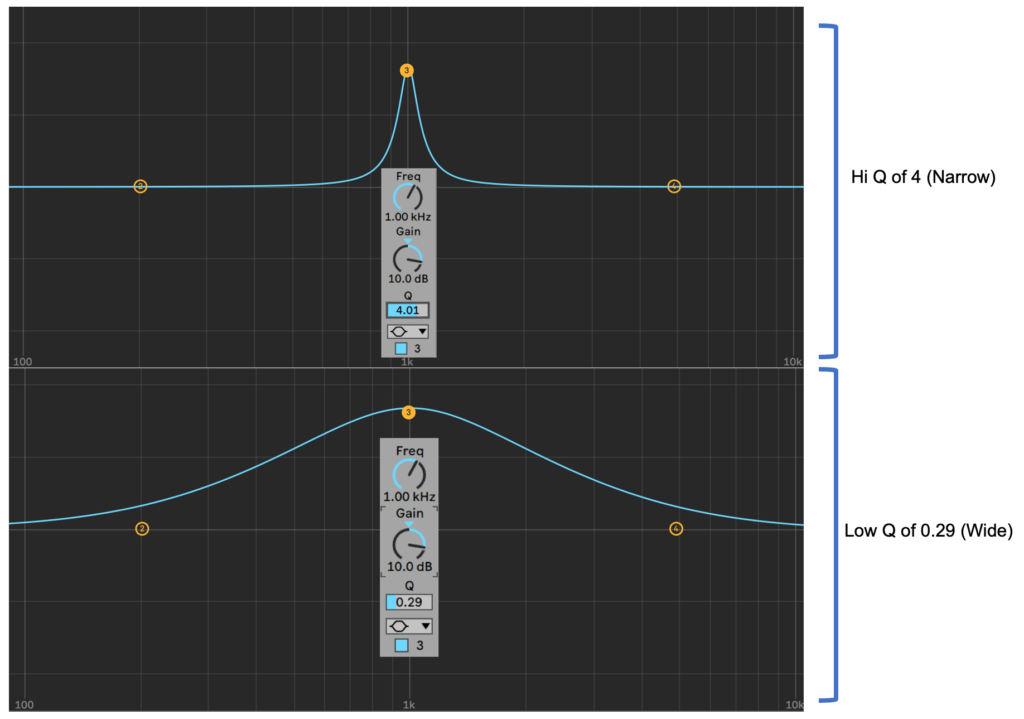
Q refers to the width at the peak of the signal/frequencies being cut/boost. The Q value of a parametric EQ can be adjusted to be wide or narrow (notch).
The Q value of a bandwidth dial is generally represented from numbers 1-10 with 1= wide and 10 = narrow.
In the Example below we have 2 EQ’s both applying 10dB of gain at 1kHz. Only the Q values are different. The Hi Q value is showing a narrow bandwidth with the Low Q showing a wide bandwidth. This can vary the EQ’s tone dramatically
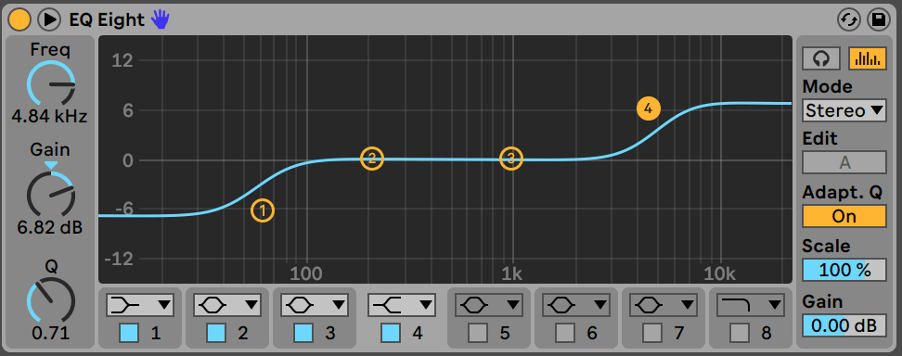
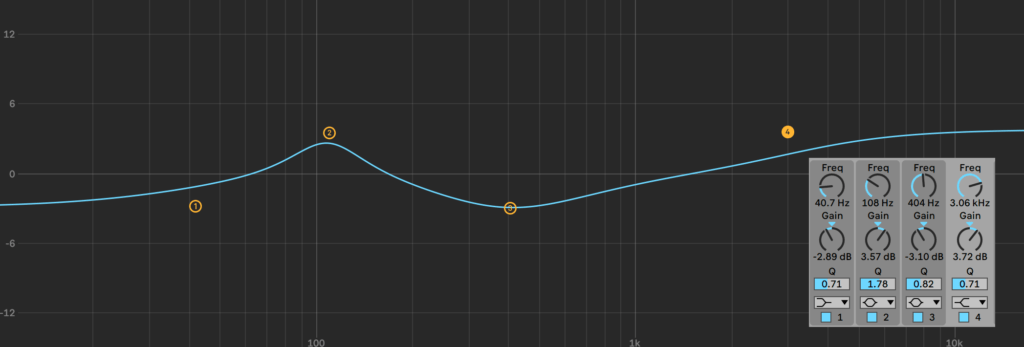
In the below example we are using 2 bands of shelving and 2 band of parametric EQ within the one EQ8 effect in Ableton.
- Band 1 – Low Shelf, a mild 2.89dB cut @ 40Hz to remove some unwanted sub bass
- Band 2 – Parametric, 3.57dB boost @ 108Hz to give the sound a little bit more power.
- Band 3 – Parametric, 3.1dB cut @ 400Hz to remove some un-wanted “boxiness”
- Band 4 – Hi Shelf, 3.72dB boost @ 3.72kHz to add some air and sparkle to the mix.
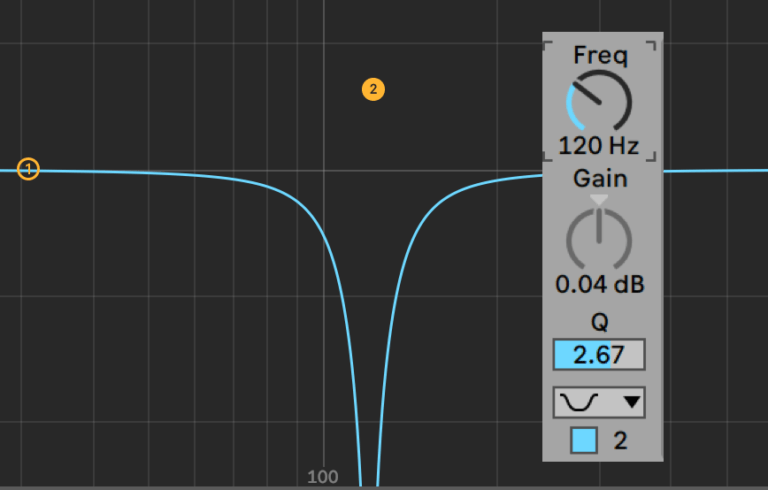
Notch Filter
A similar principle, the notch filter is a high-Q, band cut filter with higher amounts of attenuation. It is used for slicing or removing a band of problem frequencies.
High & Low Pass Filters
These filters offer some differences to the other filter types already mentioned. They can be used in many situations including use on mixing consoles for the purpose of filtering out unwanted bass rumble frequencies or synthesizers where they are used to shape the final tone.
- High Pass Filter – A filter that allows high frequencies to pass while attenuating (turning down) those below a specific frequency known as the cut off frequency. Just to confuse matters, some EQ’s like the Fabfilter Pro-Q refer to these as Low Cut Filters
- Low Pass Filter – A filter that allows low frequencies to pass while attenuating those above a specific cut off frequency. (High Cut)
All high and low pass filters will have a cut off frequency. This is the point at which the filter starts attenuating the signal

In the example above, we have a high pass filter set to 80Hz, everything below the cut-off is being filtered out (attenuated) progressively more as the frequency decreases. At the other end of the frequency spectrum we have a High Pass Filer set to 3kHz, everything above the cut-off is being filtered out.
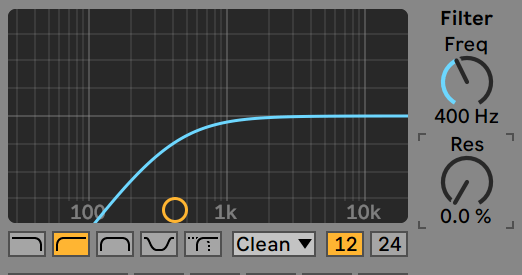
The examples below show Ableton Lives Auto Filter plug-in.
This is a HPF set to 400Hz. This means that all frequencies above 400Hz are being allowed to pass through and be heard where all frequencies below 400Hz are being progressively filtered out.
Some high and low pass filters will have a variable cut off frequency, whilst others have a fixed cut off frequency (it is either turned on or off).
The next important feature of many High Pass & Low Pass filters is the steepness of the filter curve, often measured in dB per octave.
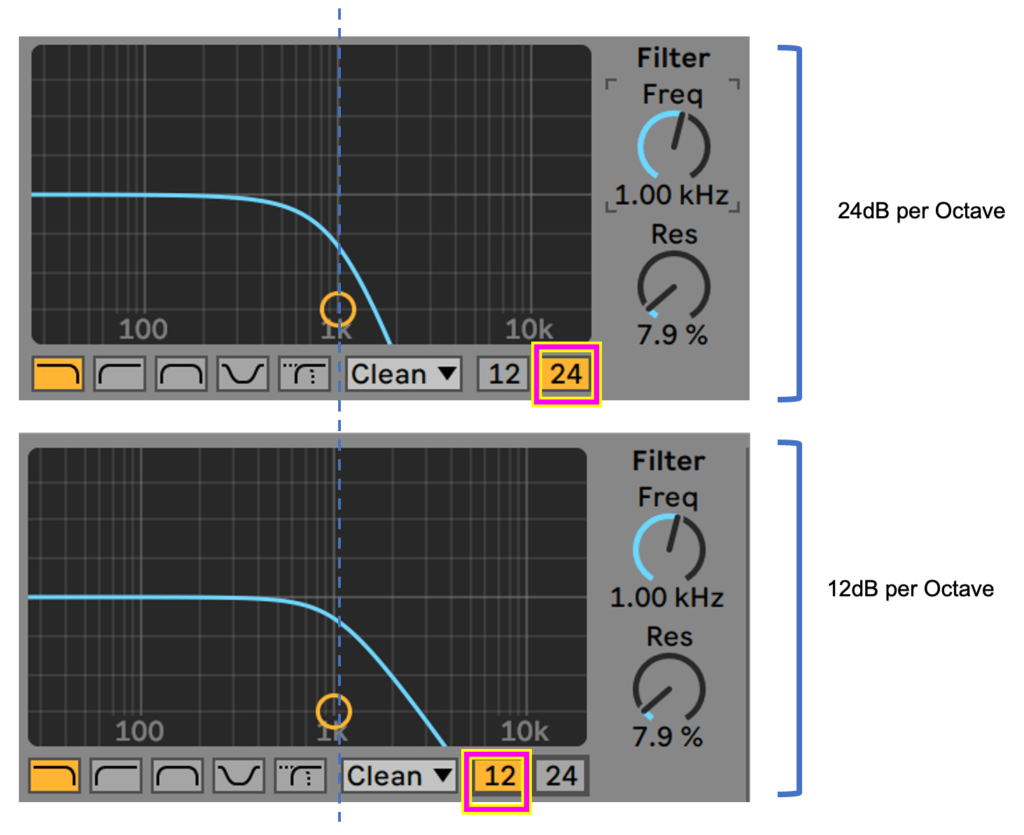
In the following example we have 2 low pass filters setup with their frequency cut-off control set to 1kHz. The top example shows the use of a 24dB per octave filter (steeper) with the bottom showing a 12dB per octave filter.
Notice how the filter curve after the frequency cut-off (indicated by the blue dotted line) is steeper and achieves full filtration earlier than the 2nd example. This means the top 24dB per octave example will filter out more frequencies than the 2nd example. Ultimately the 2 curves will sound different and which one you choose is completely dependent on the sound you are trying to achieve.
The steepness or dB per Octave value will vary between filters and are usually one of the following types.
- -6dB per octave = 1st Order (1 Pole)
- -12dB per octave = 2nd Order (2 Pole)
- -18dB per octave = 3rd Order (3 Pole)
- -24dB per octave = 4th Order (4 Pole)
Some Hi and Low Pass Filters will also have a resonance control. This control allows you to apply a boost in level at the cut off frequency. This can change the character of the filter quite dramatically.
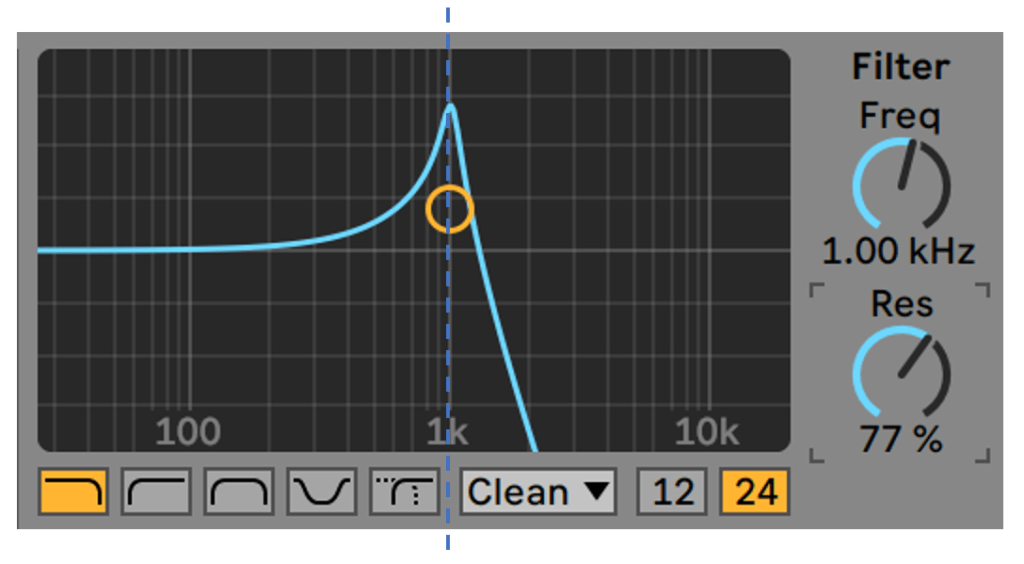
Resonance is a common effect found in filter sections of Synthesizers and Samplers. High amounts of resonance whilst sweeping the frequency can give interesting results and is an effect often heard in modern forms of electronic music.
High Pass Filters are not only useful in synthesizer and music production scenarios. Most mixing consoles will have a high pass option which can be switched on to remove unwanted bass frequencies.
Example – if a mic has a range of 20Hz- 20kHz and the persons speaking voice is picking up frequencies between 80Hz – 12kHz, any low frequency noise below 80Hz will still be picked up. It would be best to cut these frequencies out as they may cause low level “rumble”.
Ableton Live Audio Effect Reference
The Ableton manual is available online and is well worth referencing when extra information is required. The following sections relating to the EQ and filters can be found here: https://www.ableton.com/en/manual/live-audio-effect-reference
EQ Guidelines
20 – 50/60Hz (Sub Bass)
- More felt than heard
- Adds a sense of power and depth to the music
- Excess increases muddiness.
50/60 – 250Hz (LF, Bass)
- Fundamentals of the rhythm section
- Affects the thickness of the sound
- Excess increases boominess
250Hz – 1/1.5KHz (Low Mid)
- Fundamentals of instruments
- Lower order harmonics
- Boost can accentuate telephone-like quality
- Boosting 500Hz – 1KHz produces a horn-like quality
- Boosting 1KHz and above produces a tinny sound
- Excess of 400 – 800 HZ exacerbates boxiness
- Excess can cause listening fatigue
1/1.5 – 6/8KHz (High Mid)
- Higher order harmonics
- 3KHz is critical: cut instruments, boost vox for vocal clarity
- Presence range is 4 – 6KHz, for clarity and definition of vox/instruments
- Cutting 5KHz can make a sound appear more distant
- Boosting a mix at 5KHz by 6dB causes an apparent 3dB increase in level
- Boosting may produce sibilance
- Excess can cause listening fatigue
6/8 – 20KHz (HF, Treble)
- Higher order harmonics
- Adds sparkle and air to the sound
- Boosting may make vocal sibilance more pronounced
Instrument Guidelines
Kick Drum: Muddiness can be Eq’d out around 300hz. Slight boosts between 5-7kHz can add some high-end attack to your kick drum.
- 50-100Hz – Ads bottom end.
- 100-250Hz – Adds roundness
- 250-800Hz – Muddiness: cutting in this area can help “clear” the sound.
- 5-8kHz – High end
- 8-12kHz – Has little bearing on the sound but will add hiss.
Snare: Boosting around 60-120Hz can help add some body to the snare if it feels a little weak.
- 100-250Hz – Gives the snare a larger sound
- 6-8kHz – Ads presence and snap to the sound.
Hi Hats and Cymbals
- 250-800Hz – Muddiness: cutting in this area can help “clear” the sound.
- 1-6kHz – Presence
- 6-8kHz – Clarity
- 8-12kHz – Ads brightness, fizz and air.
Bass
- 50-100Hz – Bottom End
- 100-250Hz – Roundness
- 250-800Hz – Muddiness
- 800-1kHz – Boost in this region to add more power to small speakers
- 6-8kHz – High end
- 8-12kHz – Hiss